


-37-
W1755 6" Parallelogram Jointer
SERVICE
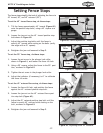
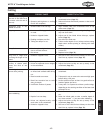
Setting Fence Stops
The fence stops simplify the task of adjusting the fence to
45˚ inward, 90˚, and 45˚ outward (135˚).
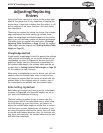
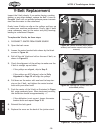
To set the 45˚ inward fence stop, do these steps:
1. Tilt the fence approximately 45° inward (Figure 60)
onto the positive stop bolts, using a 45° square as a
gauge.
2. Loosen the jam nut on the 45° inward positive stop
bolt shown in
Figure 60.
3. Adjust the positive stop bolts until the fence is
exactly 45° inward while resting on the bolts (verify
the angle with a 45° square).
4. Retighten the jam nut loosened in Step 2.
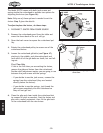
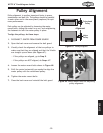
To set the 90˚ fence stop, do these steps:
1. Loosen the set screw in the plunger lock collar
shown in
Figure 61, and loosen the fence tilt lock.
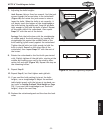
2. Using a 90° square, adjust the fence to the 90° posi-
tion, as shown in
Figure 62.
3. Tighten the set screw in the plunger lock collar.
4. Adjust the indicator (if necessary) to 0° to calibrate
the fence tilt scale.
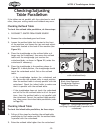
To set the 45° outward fence stop, do these steps:
1. Loosen the fence tilt lock, and position the fence
against the 45° outward positive stop bolt.
2. Loosen the jam nut on the 45˚ outward fence posi-
tive stop bolt (
Figure 63).
3. Adjust the 45˚ outward positive stop bolt until the
fence is exactly 45° outward while resting on the
bolt, as shown in
Figure 63.
4. Retighten the jam nut loosened in Step 2.
Figure 60. Fence adjusted 45˚ inward.
Figure 61. Fence controls.
Figure 62. Adjusting fence to 90˚.
Figure 63. Adjusting fence 45˚ outward.
Positive
Stop
Plunger Lock
Collar
Fence Tilt
Scale
45° Outward
Positive Stop
Bolt
Jam Nut