


-56-
N(/((('Jc`[`e^KXYc\JXn
J<IM@:<
+,Jkfg
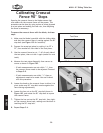
(% DISCONNECT SAW FROM POWER!
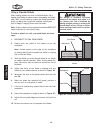
)% Adjust the blade angle until it hits the 45° positive
stop and check the blade angle with a 45° square.
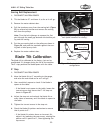
— If the blade is not 45° to the table, loosen the two
set screws that secure the 45˚ tilt stop nut shown
in =`^li\0/%(This nut can also be accessed from
the front of the saw by moving the sliding table all
the way forward.)
*% Adjust the stop nut and recheck the blade tilt as
many times as necessary until the blade is 45° to the
table.
+% Tighten the two set screws in the stop nut.
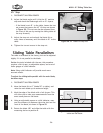
Jc`[`e^KXYc\GXiXcc\c`jd
The table is calibrated at the factory, but can be adjusted
slightly if it is not parallel to the blade.
Besides the tools included with the saw, this procedure
requires a felt tip pen, an adjustable square, and a set of
feeler gauges or a dial indicator.
Efk\1Lj`e^X[`Xc`e[`ZXkfin`ccgifm`[\dlZ_dfi\
XZZliXk\i\jlckj%
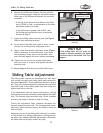
KfX[aljkk_\jc`[`e^kXYc\gXiXcc\cn`k_k_\dX`eYcX[\#
[fk_\j\jk\gj1
(% DISCONNECT SAW FROM POWER!
)% Move the blade tilt to 0˚ (blade 90˚ to table), and
raise the main blade up to maximum height.
*% Mark the edge of the blade with a felt tip pen. This
will allow you to take your measurements from the
exact same place on the blade.
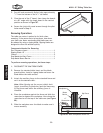
+% Using an adjustable square or a dial indicator, mea-
sure the distance (A) between the miter slot and the
front of the blade, as shown in =`^li\00.
,% Rotate the blade 180° and slide the table with the
measuring device to position B.
9cX[\
KXYc\
D`k\iJcfk
98
=`^li\00% Measuring gap between the
table and the blade.
=`^li\0/% 45° Blade tilt stop nut.
45° Tilt
Stop Nut