


-8-
Model W1821 (For Machines Mfg. Since 3/10)
SETUP
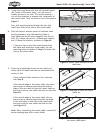
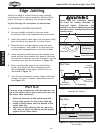
5. If you have long fence rails that will extend beyond
the T-slots of the router table, you will have to
modify the top of the rails. This entails making a
cut-out that matches or exceeds the dimensions of
the router table T-slot, as shown in the illustration in
Figure 7.
Also, drill mounting holes through the rails that
match the holes in the side of the router table.
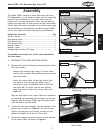
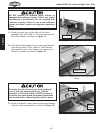
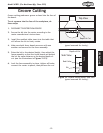
6. With the help of another person to hold the table
and leg assembly, align the mounting holes in
both tables and secure them together with the (3)
M8-1.25 x 30mm cap screws, (3) 8mm lock washers,
and (3) 8mm flat washers, as shown in Figure 8.
— If you have fence rails that extend beyond the
saw table and across the router table, use the
mounting holes you drilled in Step 5 to fasten the
rails to the router table.
Fence Rail
Router Table T-Slot
Cut-Out
Figure 7. Illustrated example of a fence
modification.
Figure 8. Router table attached to the
table saw.
x 3
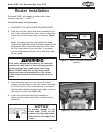
7. Place the straightedge across the saw table and
router table to make sure that the combined table
surface is flat.
— If the combined table surface is flat, continue
with Step 8.
— If the outside edge of the router table tilts down,
place strips of masking tape along the bottom
edge of the saw table to shim the router table up
and even with the saw table from side to side (see
Figure 9).
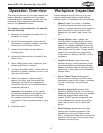
— If the outside edge of the router table tilts up,
place strips of masking tape along the top edge
of the saw table to shim the router table down
and even with the saw table from side to side
(see Figure 10).
Note: After reinstalling the router table, remove all
excess masking tape with a razor blade.
Tape
Figure 9. Using tape to shim the router
table up.
Tape
Figure 10. Positioning the tape to shim
the router table down.