


-11-
Model W1821 (For Machines Mfg. Since 3/10)
SETUP
The Model W1821 will support a router with a base
thickness between
1
⁄4" and 2
1
⁄4".
To install a router, do these steps:
1. DISCONNECT THE SAW AND ROUTER FROM POWER!
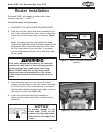
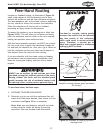
2. Slide three of the router hold-down assemblies into
the T-slots underneath the router table so that they
allow room for the router base, as shown in Figure
17.
Note: To properly position the hold-down clamp,
balance the tightness of the hold-down knob and the
adjustment bolt so that the clamp will allow room
for the router base in the next step. If necessary,
put the adjustment bolt jam nut on the other side
of the clamp.
Figure 17. Router hold-down assembly
controls.
Router Clamp
Adjustment
Bolt
Hold-Down
Knob
Router Installation
If the router unexpectedly moves or the router bit
contacts the table insert or fence during operation,
serious personal injury could result from flying
debris. ALWAYS make that at least three router
clamps are used and are applied to a flat surface
of the router base before connecting the router to
power.
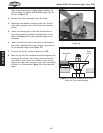
3. Slide the router base onto the three hold-down
clamps, position them so that they secure the router
bit in the center of the table opening, then tighten
the hold-down knobs and adjustment bolts to secure
the router in place (see Figure 18).
4. Install the remaining hold-down assembly to
make sure the router stays firmly in place during
operation.
Figure 18. Router properly installed.
NOTICE
To prevent damage to the
router table T-slots, do not
position the clamp adjustment
bolts over the thin edge of the
T-slots.