


-14-
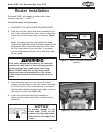
Model W1821 (For Machines Mfg. Since 3/10)
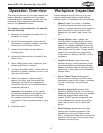
OPERATIONS
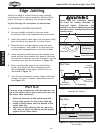
Jointing the edge of a board involves using a straight
cutting router bit to remove wood from the face of the
board. The result is a perfectly flat and square edge.
To joint the edge of a workpiece, do these steps:
1. DISCONNECT ROUTER FROM POWER!
2. Secure a straight cutting bit into your router
according to the router manufacturer's instructions.
3. Install the smallest table insert into the router table
that still allows the router bit to freely rotate.
4. Raise the bit to a height slightly more than that
of the workpiece, then rotate it by hand until the
cutting flute is perpendicular to the fence boards.
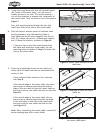
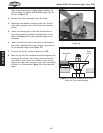
5. Insert and secure shims between the outfeed fence
board and the fence bracket that equal in thickness
the amount of material you want to remove from the
workpiece face (see the illustration in Figure 19).
6. Place a straightedge against the outfeed fence
board, then adjust the fence assembly so that
the straightedge is also against the bit flute, as
illustrated in Figure 19.
7. Lock the fence assembly in place, tighten all knobs,
connect the router to power, then perform the cut
(see Figure 20).
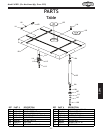
Straightedge
Shim
Outfeed
Fence Board
Straight
Router Bit
Infeed
Fence Board
Top View
Figure 19. Fence jointer setup (guard
removed for clarity).
NOTICE
If you are using a mobile base with the table saw, use
one of the options below when moving the saw and
the router table attachment:
• Attach an extension to the mobile base that
will provide support for the router table leg.
• Install a locking caster onto the bottom of the
router table leg.
• Adjust the router table leg foot up, move the
unit, then re-adjust the foot to provide proper
support to the router table.
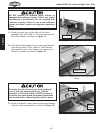
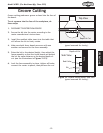
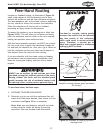
Workpiece
Feed Direction
Bit
Rotation
Always feed the workpiece against
the router bit rotation direction, as
illustrated below. Otherwise, the
workpiece could be aggressively pulled
from your hands, drawing them into the
spinning cutter.
Top View
Cutting Direction
Shim
Figure 20. Edge jointing (guard removed
for clarity).
Edge Jointing