


-10-
Model W1821 (For Machines Mfg. Since 3/10)
SETUP
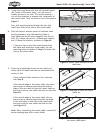
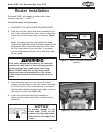
11. Attach the dust port to the back of the fence
assembly with the (4) M6-1 x 10 cap screws and (4)
6mm flat washers, as shown in Figure 14.
Figure 14. Dust port installed.
Dust Port
DO NOT operate the attached router without an
adequate dust collection system. Follow your router
manufacturer's specifications for the required dust
collection capacity. Failure to use a dust collection
system can result in short and long-term respiratory
illness.
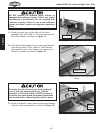
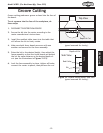
12. Slide the attached square nut on the guard bracket
into the top fence T-slot, center it with the dust
hood and dust port, then tighten the cap screw to
secure it in place, as shown in Figure 15.
Figure 15. Guard bracket attached to the
fence.
Guard Bracket
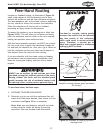
To reduce the risk of hand injury from accidental
contact with the spinning router bit, with the
exception of freehand routing, ALWAYS make sure
the fence and router guard are properly positioned
and secured before connecting the router to power.
13. Attach the plastic router guard to the guard bracket
with the (2) star knob bolts, as shown in Figure 16.
Figure 16. Router guard installed.
Router
Guard
Star Knobs