


ADJUSTMENTS
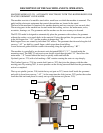
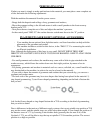
Each PG-239 machine places a grommet model and a washer, although other grommet dimensions
may be placed by replacing the corresponding parts. This replacement is quick and simple. In order
to fix a different grommet model a whole new raceway is needed together with the appropriate set of
dies.
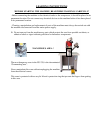
With the machine unplugged:
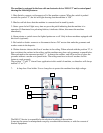
1- Remove the stripper plate spring nº 237 from the raceway spring nut nº 238 which holds it in
place.
2- Loosen both mounting screws nº 244 which are holding the front hopper box mounting bracket nº
240.
3- Use both hands for holding the grommet hopper box housing nº 242 and the grommet hopper box
bottom plate nº 241and begin to push upwards (with slight clockwise rotations) in order to remove
the whole raceway from the front hopper box mounting bracket nº 240.
The whole set of dies or some of its parts (part nº 217, 218, 219 y 229) will have to be replaced
according to the different grommet models.
The dealer that sold you this machine or directly Sinclair will let you know about the parts that
should be replaced. If no part of the set of dies needs to be replaced, continue at point 8.
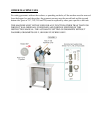
Changing the whole set of dies:
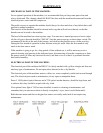
4- Pull upwardsthe ring compensator nº 233C by moving the compensator base latch nº 196 that
holds it.
5- Unscrew the top die nº 217, remove the top set spindle nº 218 and the top set spindle spring nº 229
, which are inside the top die. Unscrew the bottom die nº 219.
6- Replace the set of dies corresponding to the new grommet size, in the same order in which the
other parts were removed. Firstly the top die nº 217 with the top set spindle nº 218 and the top set
spindle spring nº 229 and then remove the bottom die nº 219.
7- Replace the ring compensator nº 233C around the bottom die nº 219, fit the compensator base
latch nº 196 into the ring compensator groove nº 233C in order to hold it in place.
Before starting the machine, it is necessary to adjust the tightness of your setting (Point 4.2.
Adjusting the tightness of setting, change of dies; page 12).
8- Fit the new grommet raceway into the front hopper box mounting bracket nº 240 while manually
rotating it back and forth, so that the driving stem nº 243 which is in the lower part, gets into the
hopper box motor spin axis nº 239.
9- Tighten both 6 allen screws nº 244 for holding the part nº 240 ,
10- Hold the stripper plate spring nº 237, which is held in place by the raceway spring nut nº 238.
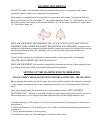
11- The lower part of the raceway where the grommet you are going to set is placed, must be on the
same vertical line as the spindle nº 218 so the spindle can take the grommet while coming down,
12- Adjust the tightness of setting (Point 4.2. Adjust the tightness of setting and changing dies).
Remember you have to keep using the same washer model, you must not change it.