


0
º
5
º
1
0
º
1
5
º
2
0
º
2
5
º
3
0
º
3
5
º
4
0
º
4
5
º
6
5
2
7
FIG. 22
FIG. 23
FIG. 24
9
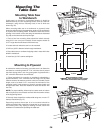
34.
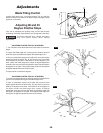
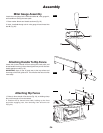
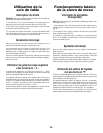
Miter Gauge Assembly
Locate the miter gauge lock handle 9, washer 10, miter gauge 11,
and bar 12 from among the loose parts.
1. Place washer 10 onto end handle as shown (Fig. 22).
2. Insert handle 9 through slot in miter gauge 11 and thread into
bar 12 (Fig. 22).
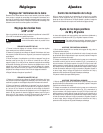
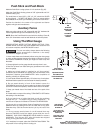
Attaching Handle To Rip Fence
Locate the rip fence handle 17 from among the loose parts, and
thread handle into the rip fence 2 and tighten hex jam nut 3 to lock
handle against cam 4 (Fig. 23).
IMPORTANT: Apply a coat of paste wax to the top surface and
front edge of the front guide rail 7. This will allow the fence to slide
more easily.
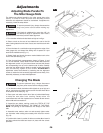
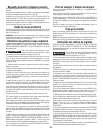
Attaching Rip Fence
1. Raise rip fence handle 17 as shown (Fig. 24), so holding clamp
5 is out far enough to fit on the table 6.
2. Position the rip fence 2 over table, holding up the front
end while engaging rear, then lowering front end onto rail
7 (Fig. 24).
Assembly
3
17
10
11
12
2
4
17