


-36-
For Machines Mfg. Since 8/09
Model SB1040/SB1041
OPERATION
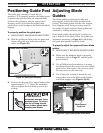
Circle Cutting Jig
The Model SB1040/SB1041 includes a jig that
attaches to the guide post to provide an easy and
accurate method for cutting circular shapes.
The jig is capable of adjusting to fit a variety of
workpiece dimensions and radii. The instructions
on this page describe the general use of the jig so
your particular setup may vary. Adjustments are
made by loosening the cap screws or set screws
that secure that hold the components in place.
Always make sure all screws are fully tightened
before beginning an operation.
If the curve you plan to cut does not touch an
exposed edge of the workpiece, you will need to
prepare the workpiece beforehand by making a
cut up to the radius line or drilling a hole next to
the radius line.
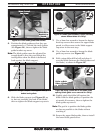
To use the circle cutting jig:
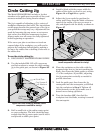
1. DISCONNECT BANDSAW FROM POWER!
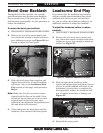
2. Use the included M8-1.25 x 25 cap screws
and lock washers to mount the circle cutting
jig to the guide post, as shown in Figure 36.
3. Drill a small hole at the radius center point
on your workpiece. The hole should be large
enough that the jig center point can fit into it
and provide a stable pivot point.
Guide Post
Cap Screws &
Lock Washers
Jig
Jig Center
Point
Figure 36. Circle cutting jig installed (some
components removed for clarity).
6. Place the workpiece on the table with the
prepared edge next to, but not touching the
blade, then lower the blade guides to within
1
⁄4" of the workpiece (if possible), adjusting
the jig centerpoint vertically as needed to
provide clearance.
7. Lock the guide post, then lower the jig
centerpoint into the centerpoint you drilled
into the workpiece in Step 3. Tighten all
of the fasteners on the jig to make sure it
doesn't move during operation.
8. Turn the bandsaw ON, then feed the
workpiece into the blade, rotating it around
the centerpoint
Prepared
Edge
Curve
Radius
Proper
Alignment
Curve
Radius
Workpiece
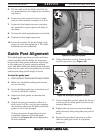
Figure 37. Adjusting curve radius
(some components removed for clarity).
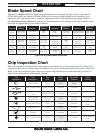
4. Install a blade with the proper width for
radius of the circle you want to cut, using
Figure 14 on Page 24 as a guide.
5. Adjust the jig as needed to position the
center point away from the blade a distance
equal to the radius of the arc you want to
cut, and aligned with the blade, as shown in
Figure 37