


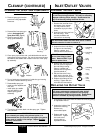


CLEANING
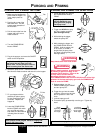
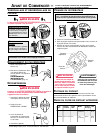
THE SPRAY GUN COMPONENTS
1. Perform Pressure Relief Procedure, page 5.
2. Remove spray gun from the
paint hose using adjustable
wrenches.
3. Remove filter from spray gun
(refer to Unclogging the
Spray Gun Filter, page 8).
4. Remove spray tip from
spray guard assembly.
5. Clean spray tip and filter with a soft-bristled brush and the
appropriate cleaning solution. Be sure to remove and clean
the washer and saddle seat located in the rear of the spray
tip assembly.
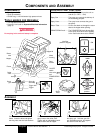
6. Pour a few drops of household oil inside the gun housing
(see area indicated below by arrow).
7. Reassemble spray gun:
• install gun filter tapered-end
first, and,
• install spray tip, saddle
seat and washer, and
replace spray guard
assembly.
8. Thread the paint hose back onto the spray gun. Tighten
with a wrench.
IMPORTANT!
If you cleaned your pump using mineral spirits, it is
recommended that you flush the pump again using warm,
soapy water to prepare it for storage. Repeat Flushing
the Pump
instructions.
Housing
Filter
Washe
r
Saddle
seat
Housing
Filter
Customer Service: 800-328-8251 10 © 2003 Wagner Spray Tech - All rights reserved.
English
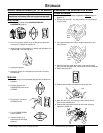
CLEANUP (CONTINUED)
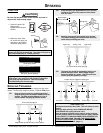
CLEANING
THE INLET VALVE
1. Remove the inlet filter from
the bottom of the hopper.
You may need to use a
screwdriver to pry the filter
loose.
2. Insert the inlet valve tool into
the inlet fitting. Twist
counter-clockwise and
remove from its housing.
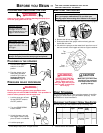
3. Inspect the three inlet fitting
O-rings on the inlet fitting.
Clean or replace, and
lubricate with household oil.
4. Retrieve the inlet valve and
the inlet valve O-ring from
the inlet fitting housing.
Clean or replace and
lubricate the O-ring with a
light household oil.
5. Set the inlet valve O-ring
back into the housing, and
set the inlet valve on top of it.
6. Replace inlet fitting into the
housing. Tighten with the
inlet valve tool and ratchet.
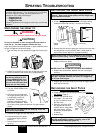
REPLACING THE OUTLET VALVE
1. Unscrew the outlet valve from the outlet valve housing using
an adjustable wrench.
2. Inspect the inside of the
outlet valve housing.
Remove any
accumulated paint.
3. Replace with a new
outlet valve. Tighten
into outlet valve
housing with an
adjustable wrench.
Replacement of the outlet valve may be necessary if
your spray performance remains poor after having
performed all the steps contained in the Spraying
Troubleshooting section of this manual. Replacement
valves are available by calling customer service.
DO NOT remove the O-rings
on the inlet fitting to clean
them. Remove ONLY if you
plan to replace them.
Inlet fitting
O-ring
Inlet fitting
O-ring
Inlet fitting
O-ring
Inlet
fitting
Inlet
valve
Inlet
valve
O-ring
You willl need to attach the inlet valve tool to a ratchet
wrench extension in order to remove it.
Cleaning or servicing the inlet valve may be required if
the unit has priming problems. This may be caused by
improper cleaning and/or storage. Replacement kits
may be ordered by calling customer service.
INLET/OUTLET VALVES