


DAIL
Y MAINTENANCE
The only daily maintenance necessary is thorough cleaning.
Follow the cleaning procedures in this manual.
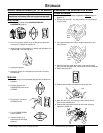
EXTENDED MAINTENANCE
Some pump parts eventually wear out from use and must be
Customer Service: 800-328-8251 12 © 2003 Wagner Spray Tech - All rights reserved.
English
MAINTENANCE
replaced. The following is a list of available repair kits. Pump
performance is the only reliable indicator of when to replace
wear parts. Refer to the Troubleshooting section for more
information on when to use these kits.
Kit Part #
Description
0515221 Inlet valve seal kit
0515205 Outlet valve kit
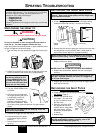
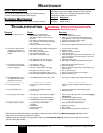
TROUBLESHOOTING
PROBLEM
A. The sprayer does not start.
B. The sprayer starts but does
not draw in paint when the
PRIME/SPRAY knob is set to
PRIME.
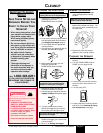
C. The sprayer draws up paint
but the pressure drops when
the gun is triggered.
D. The PRIME/SPRAY valve is
on SPRAY and there is flow
through the return tube.
E. The spray gun leaks.
F. The tip assembly leaks.
G. The spray gun will not spray.
H. The paint pattern is tailing.
CAUSE
1. The sprayer is not plugged in.
2. The ON/OFF switch is set to OFF.
3. The sprayer shuts off while still under
pressure.
4. No voltage is coming from the wall plug.
5. The extension cord is damaged or has too
low a capacity.
6. There is a problem with the motor.
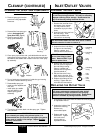
1. The unit will not prime properly or has lost prime.
2. The hopper is empty.
3. The unit is not on level ground.
4. The inlet filter is clogged.
5. The inlet or outlet valve is stuck.
6. The inlet valve is worn or damaged.
7. The PRIME/SPRAY valve is plugged.
1. The spray tip is worn.
2. The inlet filter is clogged.
3. The gun or spray tip filter is plugged.
4. The paint is too heavy or coarse.
5. The outlet valve assembly is dirty or worn.
6. The inlet valve assembly is damaged or worn.
1. The PRIME/SPRAY valve is dirty or worn.
1. Internal parts of the gun are worn
or dirty.
1. The tip was assembled incorrectly.
2. A seal is worn.
1. The spray tip or the gun filter is plugged.
2. The spray tip is in the CLEAN position.
3. PRIME/SPRAY knob not set on SPRAY.
1. The gun, the tip, or the inlet filter
is plugged.
2. The tip is worn.
3. The paint is too thick.
4. Pressure loss.
SOLUTION
1. Plug the sprayer in.
2. Turn the ON/OFF switch to ON.
3. Motor will cycle ON and OFF while spraying as it
needs pressure. This is normal. Resume painting.
4. Properly test the power supply voltage.
5. Replace the extension cord.
6. Take sprayer to Wagner Authorized Service Center.
1. Try to prime the unit again.
2. Refill the hopper.
3. Relocate unit to level ground.
4. Clean the inlet filter.
5. Clean the inlet and outlet valves and replace any worn
parts.* Inlet may be stuck from old paint. Push inlet
filter tab to release.
6. Replace the inlet valve.*
7. Take sprayer to Wagner Authorized Service Center.
1. Replace the spray tip with a new tip.**
2. Clean the inlet filter.
3. Clean or replace the proper filter. Always keep extra
filters on hand.
4. Thin or strain the paint.
5. Clean or replace the outlet valve assembly.*
6. Replace the inlet valve.*
1. Take sprayer to Wagner Authorized Service Center.
1. Take the sprayer to a Wagner Authorized Service
Center.
1. Check the tip assembly and assemble properly.
2. Replace the seal.*
1. Clean the spray tip or gun filter. Review Unclogging
the Spray Tip.
2. Put the tip in the SPRAY position.
3. Turn the PRIME/SPRAY knob to SPRAY.
1. Clean the filters and strain the paint.
2. Replace the spray tip.
3. Thin the paint.
4. Refer to Causes and Solutions for problem C.
* Special repair kits with instructions are available for these procedures. Refer to the Maintenance (page 12) section of this
manual for a list of the kits and their part numbers.
** Additional parts are available for this procedure. Refer to the Accessories (page 37) section of this manual for a list of the
parts and their part numbers.
WARNING
Before servicing, always release system
pressure by following PRESSURE RELIEF
PROCEDURE (page 5).