


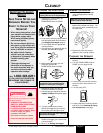


PURGING
AND PRIMING THE PUMP
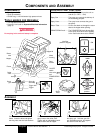
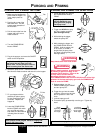
1. Make sure the inlet filter is in
place inside the hopper. If it
is not, snap in place as
shown.
2. Push the tab on top of the
filter down once. This will
ensure proper operation of
the inlet valve.
3. Pull the return tube from the
hopper and hold it over a
waste container.
4. Turn the PRIME/SPRAY
knob to PRIME.
5. Plug in the sprayer, and move the ON/OFF
switch to the ON position.
6. Switch the pump to OFF. Remove the return
tube from the waste container and secure it to the hopper.
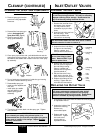
7. Fill your hopper with the
material you plan to spray.
Do not exceed the fill line
as shown. Replace the
hopper lid.
8. Leave the PRIME/SPRAY
knob on PRIME and switch
your unit ON once more
and make sure that material
is flowing from the return
tube.
Your sprayer is now purged. Move to Purging and
Priming the Spray Hose.
l
SPRAY
PRIME
Fill line
O
Any fluids remaining in the pump and
the return tube will flow out of the
return tube. Let the pump run until no
fluid is coming from the return tube.
l
SPRAY
PRIME
Tab
Customer Service: 800-328-8251 6 © 2003 Wagner Spray Tech - All rights reserved.
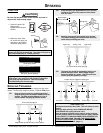
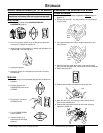
PURGING
AND PRIMING THE SPRAY HOSE
1. Unlock the spray gun and turn
the PRIME/SPRAY knob to
PRIME.
2. Trigger and HOLD the spray
gun into a waste container
(see warnings below).
3. While holding the trigger,
switch the pump ON.
4. While holding the trigger, turn
the PRIME/SPRAY knob to
SPRAY. Hold the trigger until
all air, water, or solvent is
purged from the spray hose
and paint is flowing freely (read
warnings below).
Keep hands clear from fluid stream.
Using a metal container, ground the gun
by holding it against the edge of the
container while flushing. Failure to do
so may lead to a static electric
discharge which may cause a fire.
If the PRIME/SPRAY knob is still on SPRAY, there will be high
pressure in the hose and spray gun until the PRIME/SPRAY
knob is turned to PRIME.
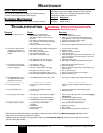
5. Release trigger, turn the
PRIME/SPRAY knob to PRIME
and turn pump OFF .
6. Trigger the gun into the waste
container once more to be sure
that no pressure is left in the
hose.
7. Lock the spray gun off.
8. Thread the spray tip assembly onto the gun. Tighten by
hand.
Your hose is now purged and primed.
Begin
tightening
the tip at
this angle
to achieve
the desired
spray angle
when tight.
O
SPRAY
PRIME
WARNING
WARNING
SPRAY
PRIME
l
Your spray tip SHOULD
NOT be attached to your
spray gun when purging
your spray hose.
SPRAY
PRIME
English
PURGING AND PRIMING