


20
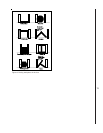
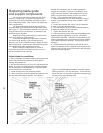
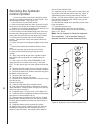
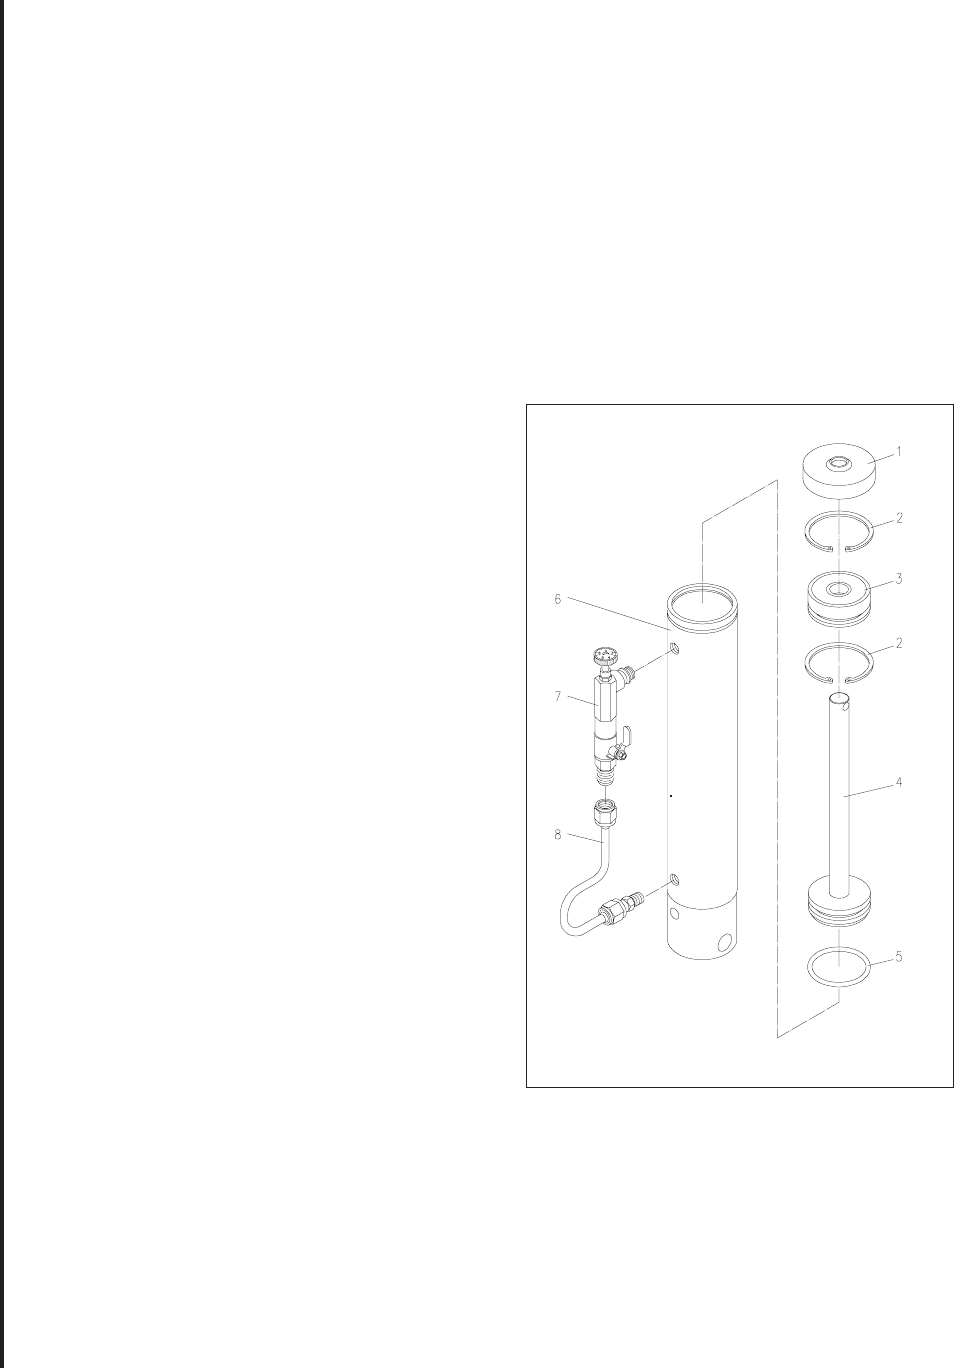
Servicing the hydraulic
control cylinder
Over a long period of service the hydraulic control
cylinder may need replacement of its internal seals. Use
the following procedure. (See Figure 18.)
1. Lower the arm to its horizontal position.
2. Remove the upper fasteners, lower set screw, and pin
which secure the cylinder to the saw arm and saw base.
3. Working over a container suitable to hold the fluid, pull
the control rod to its full extended position.
4. Remove the nut on the bottom fitting of the valve and
line assembly. Being careful not to kink the copper line,
remove the end of the line from the fitting in the cylinder.
5. Slowly push the control rod to its fully collapsed
position. This will force most of the hydraulic fluid from
the cylinder.
6. Put the line back into its fitting and tighten its securing
nut.
7. Remove the needle valve assembly from the valve
body.
8. Pull off the plastic cap at the top of the cylinder.
9. Remove the internal snap ring at the top of the
cylinder.
10. Wrap a rag around the top of the cylinder to catch
and cushion the top cap when it is expelled from the
cylinder.
11. Use a source of VERY LOW PRESSURE air and
apply pressure to the needle valve cavity in the valve
body. The top cap will pop out of the cylinder and into the
rag.
12. Remove the lower snap ring from inside the cylinder.
13. Slide the piston assembly from the cylinder, complete.
14. Remove the bottom nut, washer and rubber ring from
the bottom of the piston rod.
15. Remove piston from the rod.
16. Remove the U-ring from the piston.
17. Remove the one external and the two internal O-rings
from the top cap.
Discard all soft parts.
18. Clean all metal parts with a suitable solvent.
19. Use clean hydraulic fluid as a lubricant for all subse-
quent operations. Install the three O-rings on the top cap
and the U-ring on the piston.
20. Install the piston, U-ring lip down, on the piston rod.
21. Install the rubber ring against the bottom of the piston
and secure it with the washer and nut.
22. Slide the piston assembly into the cylinder. A slight
twisting motion will help ease the U-ring into the cylinder.
Push the piston assembly all of the way to the bottom of
the cylinder.
23. Install the bottom snap ring inside the cylinder.
24. Again working over a container which can catch any
spilled fluid, fill the cylinder with hydraulic fluid until it
comes out the valve body. Use a high quality hydraulic
jack oil for the hydraulic fluid.
25. Install the top cap on the piston rod and slide it into
the cylinder, flush with the bottom snap ring. Again, a
slight twisting motion will help ease the top cap into
positon. You will almost certainly expel some fluid from
the valve body while doing this, which is why you are
doing it over a container.
26. Reinstall the needle valve assembly into the valve
body and tighten it.
27. Install the top snap ring.
28. Install the plastic cap on top of the cylinder.
29. Reinstall the cylinder on the saw by reversing
steps 1 to 3, above.
Note: do not dispose of discarded hydraulic
fluid carelessly. Use a licensed waste oil
disposal service to handle discarded fluids.
Figure 18: Hydraulic control cylinder exploded view