


Remote Control Panel
975-0251-01-01 3–5
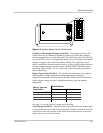
Equalize or Three-Stage Charging (Switch #1) Cycling this switch ON for 1
second, then
OFF, will initiate an equalizing charge cycle. The battery charger
must be engaged before cycling the switch. The switch must always be left in the
OFF position. If it is left ON, an equalizing charge cycle will initiate every time the
charger is engaged - this could cause battery damage. The equalizing cycle is
timed to last 8 hours from the time the switch is cycled, at which point the charger
resumes normal charging in the float stage. The BATTERY LED blinks when
equalizing. Refer to page 3–14 for a discussion of the theory and procedure for
battery equalizing.
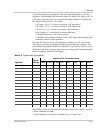
Battery Type (Switch #2 and 3) Gel cell and wet cell batteries have slightly
different charge voltage requirements and optimum battery charging is
temperature dependent. For these reasons, the DIP switches allow four different
battery charger voltage set points, depending on battery type and ambient
temperature:
See page 3–16 for the specific voltages for each setting.
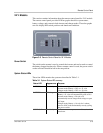
Auto Charge (Switch #4) With the switch in the
OFF position, the remote panel
ON/OFF switch only controls the inverter operation. With the switch turned ON, this
switch allows the power
ON/OFF switch on the front of the remote to control the
battery charger as well as the inverter.
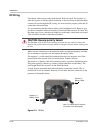
Figure 3-4
Freedom Remote Control Dip Switches
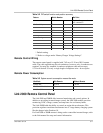
Battery Type and
Temperature
Switch Position
Switch 2 Switch 3
Cool Wet Cell (< 27 °C) Off Off
Warm Wet Cell (> 27 °C) On Off
Cool Gel Cell (< 27 °C) Off On
Warm Gel Cell (> 27 °C) On On