


13
Airless Paint Systems
Operating Instructions and Parts Manual
www.chpower.com
Maintenance (Cont.)
5. Place a 1/4” allen wrench into insert
and unscrew insert from piston.
Clean piston and seat, and then
inspect them carefully for wear and
damage. Replace these parts if
needed.
REASSEMBLY
1. To reassemble the piston assembly,
place in block using dowel pin and
hold in vise. Install ball, seat and
O-Ring in this order. Use blue
loctite 242 on retainer and screw
into piston. Tighten to 20 ft. lbs.
NOTE: For pumps manufactured prior
to Year 2000 Install, Piston Rod
Assembly PN 331-093 Only. Assembly
PN 331-093 includes all new valve parts
that will update the old pumps to
present design.
2. Lubricate piston rod with oil or
multi-purpose grease.
3. Soak leather packings in throat seal
oil or other light-weight oil for 10-
15 minutes.
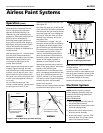
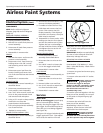
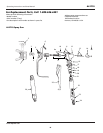
4. Reassemble all parts onto piston
rod in following order (see page 24
for picture):
a. Start with lower male adapter.
b. Five V-Packings, "V" inverted.
c. Female adaptor.
d. FiveV-Packing, "V" up.
e. Male Adaptor.
f. Slide on tube spacer.
g. Three Belleville Springs starting
with the first spring facing down
( ), second one facing up ( ),
and the third one facing down
().
h. Upper male adaptor.
i. Five V-Packings, "V" inverted.
j. Place O-rings onto seal holder.
k. Lubricate outside diameter of V-
)
(
)
packings with white lithium or
multipurpose grease.
l. Slide seal holder (2) over Upper
Packing Set.
m. Lubricate threads on inside of
pump body with white lithium or
Multipurpose grease.
5. Hold pump body in one hand
upside down and slide entire piston
assembly with packings up into
pump body, while rotating piston
and packing assembly.
6. Install packing nut, handtight only.
Push piston rod up to its upper
position.
7. Connect the fluid pump onto Unit
as per "Fluid Pump Reinstall"
Procedures on page 11.
AL2710