


GR3000
www.campbellhausfeld.com
11
Release all pressure from the system
before attempting to install, service,
relocate or perform any maintenance.
In order to maintain efficient operation of the
compressor system, check the air filter, oil level and
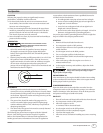
gasoline level before each use. The ASME safety valve should
also be checked daily. Pull ring on safety valve and allow the
ring to snap back to normal position. This valve automatically
releases air if the tank pressure exceeds the preset maximum.
If air leaks after the ring has been released, or the valve is stuck
and cannot be actuated by the ring, the ASME safety valve must
be replaced.
Do not attempt to tamper with the ASME
safety valve.
With engine OFF, clean debris from engine, flywheel, tank, air
lines and pump cooling fins.
TANK
Never attempt to repair or modify a
tank! Welding, drilling or any other
modification will weaken the tank resulting in damage
from rupture or explosion. Always replace worn, cracked or
damaged tanks.
Drain liquid from tank daily.
The tank should be carefully inspected at a minimum of once
a year. Look for cracks forming near the welds. If a crack is
detected, remove pressure from tank immediately and replace.
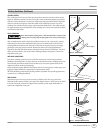
PUMP DRIVE BELT
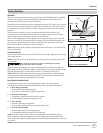
Belt stretch is a result of normal use. When properly adjusted,
the belt deflects about 1/2 inch with five pounds of force applied
midway between the engine pulley and pump pulley.
To adjust pump belt tension:
1. Remove belt guards.
2. Loosen the four fasteners holding the pump to the
baseplate.
3. Shift the pump in the proper direction. The belt must be
properly aligned when adjustment is made.
4. To align belt, lay a straight edge against the face of the pump
pulley, touching the rim at two places.
5. Adjust engine pulley so that the belt runs parallel to
the straight edge. The engine pulley is attached to the
crankshaft with two setscrews.
6. Tighten four fasteners holding the pump to the baseplate.
7. Recheck tension and alignment. If correct, reinstall belt
guards.
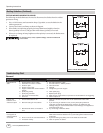
ALTERNATOR DRIVE BELT
The alternator uses a synchronous drive belt transmitting a
significant amount of power. Belt tension is critical to belt life.
New synchronous belts will stretch after installation and use.
When properly adjusted, the new belt deflects 1/10 inch with
4.5 to 4.9 pounds of force applied midway between the engine
pulley and the alternator pulley. For reinstalling a used belt, the
correct force to apply is 3.3 to 3.7 pounds for the same 1/10 inch
deflection.
To adjust alternator belt tension:
1. Remove belt guard.
2. Loosen 2 pivot bolts and clamp bolt in alternator base plate.
3. Adjust tension nut in alternator base plate to obtain the
proper tension. The belt must be properly aligned when the
adjustment is made.
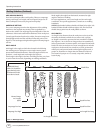
4. To align belt, lay a straight edge against the face of the
alternator pulley, touching the rim at two places. The
straight edge should be parallel with the belt.
5. Adjust alternator or engine pulley so that the belt runs
parallel to the straight edge.
6. The synchronous pulleys are attached to the shafts using
tapered bushings. The two set-screws must be removed and
one reinserted into the hole with threads on the inner half.
Tighten this screw to press the pulley and bushing apart.
7. Once the bushing is moved to the correct position, move the
two set-screws back to their original locations in the holes
with threads on the outer half and tighten to 175 in-lbs.
8. Tighten 2 pivot bolts and clamp bolt in alternator base
plate.
9. Recheck tension and alignment. If correct, reinstall belt
guard.
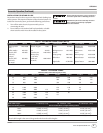
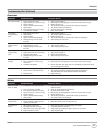
Maintenance
MAINTENANCE SCHEDULE
OPERATION DAILY WEEKLY MONTHLY 3 MONTHS
Check Oil Level
l
Drain Tank
l
Check Air Filter
l
Check Safety Valve
l
Check Belt Tightness
l
Change Oil
l