


10
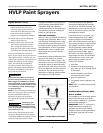
Operating Instructions and Parts Manual
HVLP Paint Sprayers
Additional
Instructions for Model
HV2105 (3F485) (Cont.)
NOTE: The following action should be
done without the turbine running.
10. When your desired pot pressure has
been set, pull the spray gun trigger
back. The first time you are using
the pressure pot each day, or after
the pressure pot has been
depressurized, it will take about a
minute for the material to flow
through the fluid hose to the spray
gun (priming the spray gun).
11. Hold the spray gun safely away
from you. When the material
reaches the tip of the spray gun, a
stream of fluid will flow out.
12. Watch the fluid stream. It should
extend out 2-1/2” (6.35 cm) before
the stream begins to bend. If it
extends out more than this, then
you have too much pressure. If it is
too little, then you need more
pressure. Adjust accordingly.
13. Once this is adjusted, locate the
black ring on the pressure regulator
and screw it back into the pressure
regulator knob. This will lock the
regulator settings in place.
14. Turn on the turbine system. You
should now be able to spray
continuous volume from the
pressure pot.
NOTE: Never open the pressure pot
without turning off the air compressor
and releasing the air pressure in the
pot with the air pressure release valve.
(Open valve until all pressure is
released. Pressure gauge will read “0
psi” when there is no more pressure in
the pot).
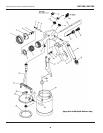
CLEANING THE SYSTEM
1. When you are finished spraying for
the day, it is wise to clean your
www.chpower.com
HV2100, HV2105
spray gun, the pressure pot and the
fluid line. While it is possible to
leave fluid in the pressure pot
between uses, be sure that all
materials are compatible with the
components of the pressure pot to
avoid fluid contamination. Never
leave catalyzed or epoxy materials
in the pot beyond suggested pot
life of the fluid product to avoid set
up and hardening of the coating
and damage to the pot, its
components, fluid lines and the
spray gun.
2. Release all air pressure in the pot.
Locate the air release valve and
turn counterclockwise.
3. You will hear a “hissing” sound.
The pressure in the pot is now
releasing. You will also notice that
pressure gauge will lower to “0
psi”. Once there is no more
pressure in the pot, it is safe to
open.
4. Follow normal cleaning procedures
of the spray gun as outlined in the
Maintenance section and in the
information supplied with the spray
gun.
5. Clean pressure pot and fluid lines
with appropriate cleaning materials
for the product being sprayed. Use
caution and follow all safety
guidelines specirfied by the product
manufacturer.
6.. Spray cleaning fluid from the
pressure pot through the fluid line
and the spray gun until you are
satisfied that all paint or coating
material has been flushed through
the system.
Store equipment for future
application.
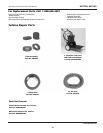
Maintenance
TURBINE MAINTENANCE
The turbine unit needs very little
maintenance. The motor has sealed
bearings that are pre-lubricated. No
service is necessary. Periodically, the
turbine air filters and pre-filters should
be examined. Clean filters are critical
to good performance and equipment
longevity. Your turbine has 2
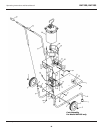
replaceable filters (see Turbine Repair
Parts on page 13).
- Remove the two hex-head securing
nuts in order to remove the filters
for cleaning or replacement.
- Periodically wash and blow excess
dust and dirt with water and an air
compressor. Dirty filters will reduce
the air being drawn through the
motor. This will cause the unit to run
unusually hot, and it will lower spray
performance and reduce the life of
the motor.
- Clean and/or replace filters and pre-
filters when you suspect they can no
longer be cleaned.
CLEANING YOUR SPRAY GUN
After spraying, clean your spray gun to
prevent buildup and hardening of
coating inside. Proper cleaning will
help prevent equipment damage and
will increase equipment life.
1. Empty any unused paint from the
paint cup. Wash out any residue with
a cleaner compatible with the
coating, or water if using a water
based material.
2. Fill the cup part way with cleaner.
Spray through the gun to flush out
the material passages.
3. Remove the air cap and clean. Make
sure that the air holes in the horns of
the air cap are clean.
4. Using a brush and solvent, remove
any paint deposits on the outer
surface of the tip/nozzle. If it is