


8
Operating Instructions and Parts Manual
HVLP Paint Sprayers
Operation (Cont.)
USING PRESSURE POTS WITH
TURBINE SYSTEMS (HV2105)
When using a remote cup or pressure
pot, it is necessary to introduce
compressed air in order to pressurize
the remote pot and move the fluid
from the pot to the tip/nozzle of the
spray gun. In general, 5 pounds of
pressure is sufficient for most average
viscosity fluids in order to deliver the
proper flow of fluid to the tip. Higher
pressure would only be necessary for a
heavier viscosity fluid.
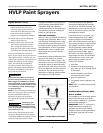
A good test to determine the correct
fluid delivery is as follows:
1. Pressurize the pot. DO NOT turn on
the turbine.
2. Pull spray gun trigger until a stream
of fluid flows from the tip/nozzle.
3. Adjust the pressure until the fluid
drops off or bends at approximately
2-1/2 inches (6.35 cm). Pot pressure
should be correct at this point.
Always depressurize the remote pot
using the safety valve when the
equipment will be idle for a while. This
will prevent excess fluid from
remaining in the fluid hose, and
prevent a possible accident should the
trigger be pulled and paint streams
from the spray gun.
Always ensure that the remote cup is
tightly sealed, and all gaskets are in
good shape, to prevent air and fluid
leaks.
Be sure to flush and clean fluid hose at
the end of a work session.
For smaller jobs, insert a one gallon
can inside the 2.5 gallon pressure pot.
This will keep the inside of the pot
clean.
!
WARNING
www.chpower.com
HV2100, HV2105
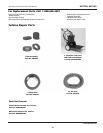
USING OPTIONAL ACCESSORIES
WITH SPRAY GUN
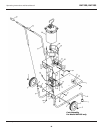
OPTION 1: In parts diagram on page
14, locate Item No. 13. Most turbine
spray guns are fitted with this blanking
cap. You can remove the cap and
install Item Nos. 14A and 14B. This
gives you the option to attach your air
hose onto this port instead of into the
handle. To install, unscrew blanking
cap. Screw in Item No. 14A and 14B. To
use this port, unscrew the male hose
coupler and screw onto Item No. 14A.
Take the small blanking cap (Item No.
14B) and screw it onto the threads at
the bottom of the handle. Reverse
these two fittings to use the air hose
coupled to the handle.
OPTION 2:
This will allow you to
control the air flow and create
textured or splatter paint effects. To
install, remove blanking plug (Item No.
13) or Item Nos. 14A and 14B. Screw
Item No. 13A into the spray gun. After
installing the air control/texturing
device, turn the adjusting screw as far
as you can counter clockwise (open).
Always use in the full open position
unless it is necessary to reduce the flow
of air, or to create a textured or
splatter effect.
Additional
Instructions for Model
HV2105
UNPACKING
Remove contents of shipping box and
lay out all of the pieces. You will find
the cart base, handle, 2.643 gallon
(10L) pressure pot (with regulator,
gauge, safety valve and connectors
attached), 3/8” black lined fluid hose,
bag of nuts and bolts for assembly, and
instructions.
NOTE: Do not place pressure pot onto
the cart or insert handle into cart base
until the turbine unit is firmly bolted
and secured to the cart. Using the cart
without the turbine installed can result
in the cart tipping over.
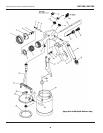
ATTACHING TURBINE UNIT TO CART
1. Set the turbine unit on the cart
base plate with the turbine air
hose quick disconnect coupler
facing out.
2. Line up the four holes on the
turbine base plate with the four
holes on the cart base plate.
3. Secure turbine unit to cart base
plate with the four hex bolts,
washers and hex nuts (supplied).
Insert bolt through the holes, place
washer over the bolt on the
underside, screw hex nut onto bolt
and tighten. Be sure that hex nut is
tight enough so as not to vibrate
loose.
4. Insert the chrome handle into the
frame tube. Be sure to push handle
all the way down so that the spring
loaded buttons lock into place,
securing the handle firmly.
5. Plug turbine unit into outlet on side
of the Cart.
4. Place the 2.643 gallon (10L)
pressure pot onto the pressure pot
deck. Align the fluid outlet toward
the front of the cart. This will
position air inlet toward the back
of the cart.
NOTE: Pressure pot support rings can
be adjusted for use with different size
pressure pots.
CONVERT SPRAY GUN FROM CUP
GUN TO PRODUCTION FLUID FEED
1. Remove cup assembly.
a. Disconnect the upper section of
the air feed tube from the non-