


9
HVLP Paint Sprayers
Operating Instructions and Parts Manual
Additional
Instructions for Model
HV2105 (Cont.)
return valve, leaving the valve
attached to the lower section of
the tube. This will provide safe
storage while using the spray gun
without the cup in a production
mode.
b. With a wrench, loosen the center
bolt and remove the cup assembly.
Set aside.
c. Remove air feed connector and
upper section of air feed tube
with small wrench.
d. Install the blanking screw provided
(10/32”) to close the hole where
you removed the air feed
connector. Store the air feed
connector with tube attached in
the cup assembly for future use.
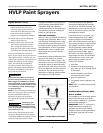
ATTACHING AIR HOSE AND FLUID
HOSE
1. Attach turbine air hose to handle
of spray gun with quick disconnect
coupler.
2. Insert the male coupler on the
other end of the air hose into the
quick disconnect coupler on the
turbine unit. 3. On spray
gun, put a strip of Teflon tape
around the threads on the fluid
connector.
4. Screw one end of the black fluid
hose onto fluid connector. Secure
and tighten.
5. Locate paint outlet on lid of the
2.643 gallon (10L) pressure pot
(marked on the pot). Put a strip of
Teflon tape around the threads of
the Fluid Connector.
www.chpower.com
HV2100, HV2105
6. Take the other end of the black
fluid hose and attach it to the
paint outlet (marked on the pot).
Secure and tighten.
7. Locate the compressor under the
Pressure Pot Deck. Take the air
hose from the compressor and
connect the female quick
disconnect to the male connector
(marked air inlet).
8. Your cart system is now set up for
production spraying.
PREPARING TO SPRAY
NOTE: Never open the pressure pot
without turning off the air compressor
and releasing the air pressure in the
pot with the air pressure release valve.
(Open valve until all pressure is
released. Pressure gauge will read “0
psi” when there is no more pressure in
the pot).
1. Prepare your paint or coating for
spraying. Adjust viscosity as
recommended. See page 6 for
viscosity guidelines.
2. Carefully loosen the four wing nuts
to remove the pot lid. Open the
pressure pot. (NOTE: You may have
to disconnect the air hose from the
compressor when opening the lid.
Be sure to reconnect air hose when
the lid is closed again). You can
either pour your coating into the
pot, or you can insert a smaller
container inside the pot, making
sure that the material pick-up tube
is inserted into the coating. Place
the lid back on top of the pressure
pot, making sure that it is properly
seated. Bring each wing nut back
into place and secure the lid firmly.
3. Secure each wing nut into place
using a cross pattern, rotating an
even amount of pressure on each
one until each is tight and secure.
4. Plug the power cord into a proper
grounded receptacle outlet.
If you are using an
extension cord, it is
imperative to use at least a 12 gauge
cord to avoid damage to electrical
components.
SETTING POT PRESSURE AND
PRIMING SPRAY GUN
5. Turn on the mini-compressor unit.
Locate the on/off switch, which is
mounted on top of the silver box
on the compressor located at the
back of the cart. Move the switch
to the “ON” position. You should
hear the compressor activate.
6. Look at the pressure gauge located
on top of the pressure pot lid. You
will notice the gauge begin to rise.
Attached to the pressure gauge is
the pressure regulator. The
pressure gauge will tell you how
much pressure is in the pressure
pot. Generally you will only need
about 5 psi for most light to
medium viscosity fluids. Increasing
pressure should only be necessary
for high viscosity fluids.
7. If the pressure rises above the
desired maximum, you can release
pressure in the pot with the air
release valve and control the
maximum amount of pressure with
the pressure regulator.
8. To decrease pressure, rotate the
knob on the pressure regulator
counterclockwise. To increase
pressure rotate the knob clockwise.
Stop when the desired pressure is
achieved.
9. Your compressor is set to shut off
when the desired pressure is
reached and back on when the
pressure drops down. This has been
preset at the factory and should
not be readjusted.
NOTICE