


6
Pre-Operation (Cont.)
PREPARING TO SPRAY
After some practice, you should be
ready to spray your coating of choice
on your work piece. (See the
Operation section for more
information on spray patterns, spray
gun use, and other usage procedures).
Good quality results with your HVLP
system are a combination of:
- Careful preparation of your
project
- A proper spraying environment
- A basic knowledge of the coatings
you will be using and how these
coatings work with your spray
equipment
- Close adherence to safety
precautions
Operation
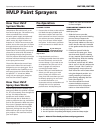
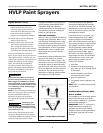
SPRAY PATTERNS
Your spray gun offers you many
options. You can adjust (click) the air
cap to three positions. One will
produce a horizontal pattern for
spraying across, another will produce a
Operating Instructions and Parts Manual
HVLP Paint Sprayers
vertical pattern for spraying up and
down, and the third will produce a
round pattern to spray small or narrow
pieces. (See Figure 2.)
USING YOUR SPRAY GUN
Your spray gun is certified High
Volume Low Pressure. This means your
spray gun only uses from 3 psi to 10 psi
(depending on your turbine unit) of air
pressure measured at the air cap. All
passages and air ports are much larger
than on a conventional spray gun. If
one of these air passages becomes
blocked, or buildup of material starts
to occur, your spray pattern will
become distorted. Therefore, always
keep your spray gun clean.
Your spray gun comes fitted with a
1mm tip/nozzle and needle inscribed
with the number “2”. This will cover
about 85% of all the
materials/coatings that you will spray.
Using this size tip/nozzle and needle,
you can achieve a 1/4" line up to a 10"
fan pattern just by rotating the air cap
to the desired fan type (see Spray Gun
Diagrams), opening the material flow
knob counterclockwise and moving the
spray gun closer or further away from
your work piece. A little practice will
enable you to master this technique.
PRACTICE:
Practice using your spray
gun by following these steps:
1. Remove the cup from your spray
gun. Fill it halfway with some
water.
2. Attach the cup to the body of the
spray gun.
3. Attach the spray gun to the air
hose.
4. Turn the turbine unit on.
5. You will notice air is now flowing
through the air cap. This is normal
and correct.
6. Position the air cap in the
horizontal position (see Figure 2)
and turn the material flow knob
counter clockwise approximately 1
to 1-1/2 turns.
7. Point the spray gun away from
yourself (and anyone else) and pull
the trigger all the way back. You
should see a “V” shaped mist (or
triangle) called a fan pattern.
8. Now, with the trigger depressed,
slowly begin to turn the material
flow knob clockwise (closing).
Notice that the fan pattern is
beginning to get smaller.
9. Turn the material flow knob
counterclockwise and notice the
pattern get larger.
10. Take a large piece of cardboard
and direct the pattern at the
surface. Turn the material flow
knob 2 full turns and hold the spray
gun approximately 6" from the
surface.
11. Pull the trigger. Observe the
outline and size of the pattern.
12. Turn the material flow knob
clockwise (closing). Move the spray
gun 1-2” closer to the surface.
www.chpower.com
HV2100, HV2105
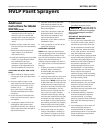
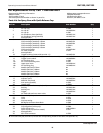
Type of Coating Amount to Thin/Reduce (Typical)
Lacquers 25-50%
Sanding Sealer 20-30%
Enamels 20-40%
Stains Use from can
Acrylic Enamel 50-60%
Catalyzed Polyurethane 10-30%
Polyurethanes, Varnishes 20-30%
Waterborne Coatings 0-10%
Latex Paint, Emulsion Paint 10-40%
NOTE: The amount of thinning needed will depend on the model turbine used,
flow out properties of the coating, and the desired appearance of the finished
work piece. It is best to test spraying results prior to thinning.
Table 4 - Types of Coatings, Recommended Amount of Thinning
Viscosity