


36 Sp
Manual de Instruccones y Lista de Repuestos
No funciona
El alambre se enrolla en
la bobina
La boquilla se pega a la
superficie de trabajo
La pinza de conexión a
la pieza de trabajo y/o el
cable se calientan
El alambre no circula
1. Excedio el ciclo de trabajo
2. Mala conexión a la pieza de
trabajo
3. El interruptor ON/OFF está
defectuoso
4. El fusible o cortacircuito está
quemado
1. La boquilla de la pistola no es
del tamaño adecuado
2. El forro interno de la pistola está
atascado o dañado
3. La boquilla de la pistola está
atascada o dañada
4. La bobina está des-
gastada
5. No tiene suficiente tensión
Hay escorias dentro de la boquilla
de la pistola
Mala conexión
1. Está atascado
2. Se terminó el cable en la bobina
3. No tiene suficiente tensión
4. El forro está desgastado
1. Permita que la soldadora se enfríe hasta que la lámpara se
apague.
2. Cerciórese de que todas las conexiones estén bien apretadas y
de que las superficies estén limpias
3. Reemplace el interruptor
4. Reduzca la carga del circuito, active el cortacircuito o reemplace
el fusible
1. Use una boquilla del tamaño adecuado
2. Limpie o reemplace el forro interno de la pistola
3. Limpie o reemplace la punta de la pistola
4. Reemplácela
5. Apriete el tornillo de tensión
Limpie la boquilla de la pistola
Cerciórese de que todas las conexiones estén bien apretadas y de
que las superficies estén limpias
1. Instale el cable una vez más
2. Reemplácelo
3. Apriete el tornillo de tensión si el alambre se está saliendo
4. Reemplácelo
Reborde es muy delgado en
algunos sitios
Reborde es muy grueso en
algunos sitios
Los bordes de la soldadura
están disparejos
El reborde no penetra el
metal básico
El electrodo salpica y se pega
1. La velocidad de desplazamiento varia
2. El nivel del amperaje es muy bajo
1. La velocidad de desplazamiento varia
o es muy lenta
2. El nivel del amperaje es muy alto
1. La velocidad de desplazamiento es
muy rápida
2. La velocidad de alimentación es muy
rápida
3. El nivel del amperaje es muy alto
1. La velocidad de desplazamiento varía
2. El nivel del amperaje es muy bajo
3. El cordón de extensión es demasiado
largo
1. El alambre está húmedo
2.La velocidad del alambre está muy
rápida
3. El alambre es del tipo incorrecto
1. Debe reducirla y mantenerla constante
2. Debe aumentarlo
1. Debe aumentarla y mantenerla constante
2. Debe bajarlo
1. Debe reducirla
2. Debe aumentarla
3. Debe bajarlo
1. Debe reducirla y mantenerla constante
2. Debe aumentarlo
3. Use un cordón de extensión que no sea de más de
6,10 m
1. Use un alambre seco y siempre debe almacenarlo e
un sitio seco
2. Reduzca la velocidad del alambre
3. Use sólo alambre de fundente revestido (No use
alambres para soldadoras MIG, o alambre de cobre)
Guía de diagnóstico de averías - Soldadora
Problema Posible(s) Causa(s) Acción a tomar
Guía de diagnóstico de problemas - Soldadura
Problema Posible(s) Causa(s) Acción a tomar
5
Operation (Continued)
8. Switch the welder ON/OFF switch to
the ON position.
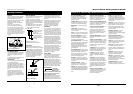
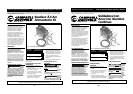
9. Verify that the wire is extended 1/4”
from the contact tip. If not, squeeze
the trigger to feed additional wire,
release the trigger, and cut wire to
proper length.
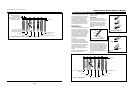
10. Position the wire feed gun near the
work piece, lower the welding
helmet by nodding the head, or
position the hand shield, and
squeeze the gun trigger. Adjust heat
setting and wire speed as needed.
11. When finished welding, turn welder
off and store properly.
Maintenance
Disconnect power
supply and turn
machine off before inspecting or
servicing any components. Keep the wire
compartment cover closed at all times
unless the wire needs to be changed.
Before every use:
1. Check condition of weld cables and
immediately repair or replace any
cables with damaged insulation.
2. Check condition of power cord and
immediately repair or replace any
cord if damaged.
3. Inspect the condition of the gun tip
and nozzle. Remove any weld slag.
Replace gun tip or nozzle if
damaged.
Do not operate this
welding machine
with cracked or missing insulation on
welding cables, wire feed gun, or power
cord.
Every 3 months:
1. Replace any unreadable safety labels
on the welder.
2. Use compressed air to blow all dust
and lint from the ventilation
openings.
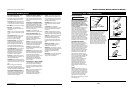
3. Clean the wire groove on the drive
roll. Remove wire from the feed
mechanism, remove screws from the
drive roll housing. Use a small wire
brush to clean the drive roll. Replace
if worn or damaged.
!
WARNING
!
WARNING
Consumable and Wear Parts
The following parts require routine
maintenance:
• Wire feed drive roller
• Gun liner - replace if worn
• Nozzle/contact tips
• Wire - The WF2050 will accept either
4” or 8” diameter spools. Flux-cored
welding wire is susceptible to
moisture and oxidizes over time, so it
is important to select a spool size that
will be used within approximately 6
months. Use AWS type E71T-GS or
E71T-11, .030” (.8mm) or .035” (.9mm)
diameter.
Models WF2050, WF2054, WF2057 & WF2058
www.chpower.com
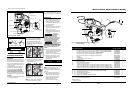
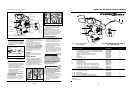
Supply Cable Replacement
1. Verify that welder is OFF and power cord disconnected.
2. Remove welder cover to expose the ON/OFF switch.
3. Disconnect the black power cord wire connected to the ON/OFF switch and
the white power cord wire from the transformer windings.
4. Disconnect the green power cord wire connected to welder frame.
5. Loosen the cord strain relief screw(s) and pull cord out of strain relief and
wire post.
6. Install new cord in reverse order.