


SKU 47606 For technical questions, please call 1-800-444-3353. Page 7
REV 03d, 07c
Operation
Note: Make sure unit is not plugged in.
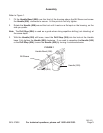
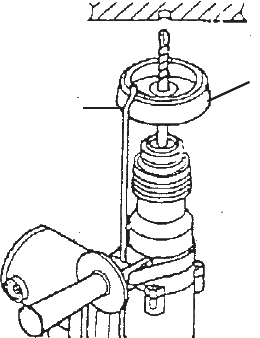
Note: If you wish, you may attach a Dust Cap for overhead
drilling applications. To do so, after you install a bit,
before you tighten the Bit Sleeve, slide the Dust Cap
over the bit and adjust the Drill Stop so that the curve on
the end of the Drill Stop secures the Dust Cap. Tighten
the Handle. See FIGURE 4.
Note: Do not plug in the Rotary Hammer until the bit is loaded, the
Drill Stop is set, and the Knob selection is complete ( See Below).
1. Following the method on page 4, number 3, under assembly,
adjust the Drill Stop to the desired length.
Note: The Drill Stop will only work when the Handle is on either side or the top of the Rotary
Hammer. The body of the Hammer will interfere with the Drill Stop if the Handle is positioned
on the bottom of the Hammer.
Warning: When setting the Knob, the Rotary Hammer must be switched off and be
unplugged. Attempting to change the Knob setting while the motor is engaged will
result in abrupt bit rotation and can cause serious personal injury and/or property
damage. See setting the Knob below.
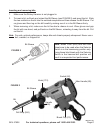
2. Set the Knob to either hammer/drill or hammer. See FIGURE 3 on page 5.
Hammer Setting: To hammer, turn the Knob so the “T” setting is lined up with the mark
on the housing.
Hammer/Drilling: To hammer/drill, set the Knob so the “IT” setting is lined up with the mark
on the housing.
Note: When setting the Knob make sure it positively clicks into the desired position. If
Knob does not click into place, it could slip out of position resulting in unexpected
tool performance.
3. Install the desired bit or chisel. Only when hammer/drilling use the Drill Stop.
4. If hammer/drilling, make sure the Drill Stop and Dust Cap, if needed, are installed
properly.
5. The Handle should be rotated to the proper position for the application.
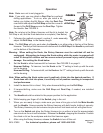
6. While keeping you nger off of the Switch, plug in the unit.
7. When you are ready to begin, make sure you have a rm grip on both the Main Handle
and the Handle. Always operate the Rotary Hammer with both hands, holding it securely.
The Rotary Hammer puts out extreme torque and will kick back and act with great force.
8. Turn on the Switch and allow the Rotary Hammer to run without a load for approximately
one minute as the unit self-lubricates. Release the Switch, stopping the Hammer. Position
the chisel or bit on the workpiece and start the Hammer again.
9. After using the Rotary Hammer, release the Switch to turn off the unit.
FIGURE 4
Dust
Cap
Curved end
of Drill Stop
FIGURE 4
Dust
Cap
Curved end
of Drill Stop