


SKU 47606 For technical questions, please call 1-800-444-3353. Page 8
Troubleshooting and Maintenance
Note: Other than changing or cleaning the carbon brushes, all internal repairs should be done
by a qualied service technician.
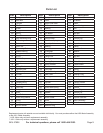
Problem Cause Action
Motor doesn’t rotate when switched
on.
Disrupted power
Poor switch contact
Armature or eld coil burnt
Broken Stator Coil
Worn carbon brushes
1.
2.
3.
4.
5.
Check Power Supply
Repair switch
Change coil
Replace Stator coil
Replace carbon brushes
1.
2.
3.
4.
5.
Abnormal motor noise, rotates slowly,
does not rotate
Overload due to excessive drilling
depth or pressure
Reduce drill depth or
pressure/decrease force
Partial short circuit Short circuit or open circuit armature Repair or change armature
Low main voltage Main power voltage too low Adjust main power voltage
Overheated gearbox Overload, dull bit
Damp coils
Incorrect tting
Decrease in voltage
1.
2.
3.
4.
Reduce load, sharpen or
replace bit
Dry coils
Repair/change armature
Adjust voltage
1.
2.
3.
4.
Sparking Short circuit or break at armature
Surface of armature dirty or rough
1.
2.
Repair armature
Clean armature
1.
2.
Note: Rotary Hammer must be unplugged before performing service and maintenance.
General maintenance:
1. Clean the work surface with a dry brush or clean cloth. Keep moving parts lightly greased.
Always keep motor and vent areas free of dust and debris.
2. Grease the tool after 50 working hours, or more frequently with increased use.
3. Remove drill bits or chisels for storage.
Changing Carbon Brushes:
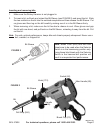
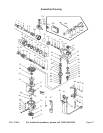
1. Using a screwdriver, remove the Brush Cap (70). See FIGURE 3 on page 5.
2. Be careful, the Brush Holder (68) may spring out. If it does not spring out easily, gently
use the tip of the screwdriver to remove it. Examine the Brush (69); the surface should
be smooth and clean. If scratch marks appear, or it is broken, replace immediately with an
approved replacement brush from Harbor Freight Tools.
3. If the Brush (69) isn’t damaged, but only dirty, clean it off with a pencil eraser. Gently rub
it until the dirt is removed. Remove the eraser dust from the Brush (69) when you are
through cleaning it.
4. Gently reinstall the Brush (69) into the Brush Holder (68) and screw the Brush Cap (70)
back on the unit and tighten.