


SKU 92496 PAGE 12
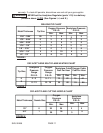
9. To determine the proper Acetylene Regulator (parts 1-19) pressure and
Oxygen Regulator (parts A1-A20E) pressure for neutral flame adjusting,
refer to Figures I, and K.
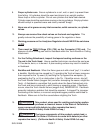
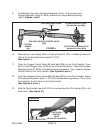
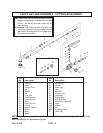
PRE-HEAT OXYGEN CONTROL VALVE
(C26)
OXYGEN CONTROL VALVE
(B8 with OX Label (B9))
ACETYLENE CONTROL VALVE
(B8 with AC Label (B10))
FIGURE L
HIGH PRESSURE LEVER
(C20)
CUTTING
NOZZLE
(D6)
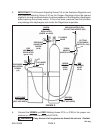
10. Depending on use, attach either a Cutting Nozzle #1 (D6), or Welding Nozzle #2
(D4) to the Cutting Attachment (parts C1-C27).
(See Figure L.)
11. Open the Oxygen Control Valve (B8 with label (B9)) on the Torch Handle. Open
the Pre-Heat Oxygen Valve (C26) on the Cutting Attachment. Adjust the Oxygen
Regulator (parts A1-A20E) to the desired working pressure. Then, close the Oxygen
Control Valve on the Torch Handle. (See Figures E, and L.)
12. Open the Acetylene Control Valve (B8 with label (B10)) on the Torch Handle. Adjust
the Acetylene Regulator (parts 1-19) to the desired working pressure. Then, close
the Acetylene Control Valve on the Torch Handle.
(See Figures E, and L.)
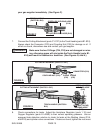
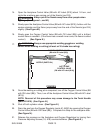
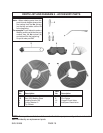
13. Hold the Torch Handle (parts B1-B10) in one hand and the Flint Lighter (D9) in the
other hand. (See Figure M.)
ACETYLENE
CONTROL
VALVE
(B8 with AC Label (B10))
FLINT LIGHTER (D9)
FIGURE M