


SKU 92496 PAGE 13
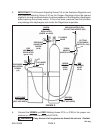
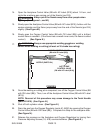
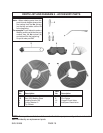
14. Open the Acetylene Control Valve (B8 with AC Label (B10)) about 1/4 turn, and
ignite the acetylene gas coming out of the Nozzle (part D4).
15. Slowly open the Acetylene Control Valve (B8 with AC Label (B10)) further until the
smoke subsides and the flame jumps away from the end of the Nozzle (part D4)
slightly. (See Figure M.)
16. Slowly open the Oxygen Control Valve (B8 with OX Label (B9)) until a brilliant
neutral flame is reached. (If the flame has a smooth inner cone, the flame is called
neutral.) (See Figure N.)
17.
WARNING!
Always point the Nozzle away from other people when
lighting. (See Figures L, and M.)
WARNING!
Always use appropriate welding goggles or welding
helmet when welding or cutting (at least a #10 shade lens rating).
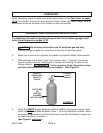
OXYGEN CONTROL VALVE
(B8 with OX Label (B9))
FIGURE N
18. Once the welding or cutting job is competed, turn off the Oxygen Control Valve (B8
with OX Label (B9)). Then, turn off the Acetylene Control Valve (B8 with AC Label
(B10)).
NOTE: Reversal of this procedure may cause damage to the Torch Handle
(parts B1-B10). (See Figure N.)
19. Shut off both cylinder valves. (See Figure E.)
20. Drain the gas from the Oxygen Regulator (parts A1-A20E) by opening the Oxygen
Control Valve (B8 with OX Label (B9)). Complete this Step on the acetylene side.
(See Figure N.)
21. Release the pressure on the Acetylene and Oxygen Regulators by turning their
Pressure Adjusting Screws (18, A18) counterclockwise. (See Figure E.)
ACETYLENE
CONTROL VALVE
(B8 with AC Label (B10))
NOZZLE (PARTS D4)