


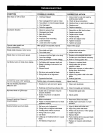


SYMPTOM POSSIBLE CAUSE(S)
Saw stops or will not start 1. Overload tripped
Excessive vibration
Cannot make square cut
when crosscutting
Blade stalls (however, motor turns)
Blade does not come up to speed
Cut binds, burns or stalls when ripping
Cut not true at 45 or 90° positions
Tilt and elevating
ha'ndwheel
difficult to turn
Rip fence binds on guide tube
Frequent opening of fuses or
circuit breakers
Material kicked back from blade
2. Saw unplugged from wall or motor
3. Fuse blown or circuit breaker tripped
4.
5.
1,
2.
3. Bad drive V-belts
4. Bent pulley
5. Improper motor mounting
6. Loose hardware
7. Loose set screw in pulley
2.
3.
Cord damaged 4,
Defective capacitor 5,
Stand on uneven floor I.
Damaged saw blade 2.
3.
4.
5.
6.
7.
Miter gauge not adjusted properly
1. Drive belts not tight
2. Drive belts worn
1.
2.
3.
1.
2,
3,
Extension cord too light or too long
Low shop voltage
Motor not wired for correct voltage
Dull blade with improper tooth set
Blade is binding at one end of cut
(heeling)
Warped board
4. Rip fence not parallel to blade
5, Riving knife out of alignment
6. Excessive feed rate
Positive stops not properly adjusted
1. Sawdust on rack and worm gears
2. Bushings and bearing surfaces dirty
1. Guide rails or extension wing not
properly installed
2. Guide of rip fence not adjusted
properly
1. Motor overloaded
2. Fuses or circuit breakers do not have
sufficient capacity
1. Rip fence out of alignment
2. Riving knife not aligned with blade
3, Feeding stock without rip fence
4, Riving knife not in place
5, Dull blade
6, Letting go of material before it is past
blade
7. Anti-kickback fingers dull
CORRECTIVE ACTION
I. A[Iow motor to cool and reset by
pushing reset switch
Check all plug connections
Replace fuse or reset circuit breaker
RepIace cord
Replace capacitor
Reposition on flat, level surface
Replace saw blade
Replace drive V-belts
Replace pulley
Check and adjust motor
Tighten hardware
Tighten set screw
Adjust miter gauge
Adjust drive belt tension
Replace drive belts
Replace with adequate size cord
Contact your local electric company
Refer to motor junction box
1.
2.
1,
2.
3.
1. Sharpen or replace blade
2. Adjust table and rip fence
parallel to blade
3. Make sure concave or hollow side is
facing down; feed slowly
4, Adjust rip fence
5. Adjust riving knife to fall in line with
blade
6. Reduce feed rate
Adjust blade tilt
1, Clean and relubricate
2. Clean thoroughly and lubricate
1. Reassemble guide rails
2. Adjust guides
1. Feed work slower into blade
2. Install proper size fuses or circuit
breakers
1. Align rip fence with miter slot
2. Align riving knife with blade
3, Always use rip fence or miter gauge
4, Install riving knife
5. Replace blade
6, Push material all the way past blade
before releasing work
7, Replace or sharpen anti-kickback
fingers
16