


Heat build-up in the tool can cause serious damage
to the tool. Allow transformer to cool down to room
temperature between each welding or each anneal-
ing operation. It is a safe procedure to let the trans-
former be idle for at least 3 minutes between
successive welding/annealing operations.
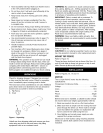
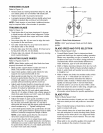
BLADE ANNEALING
• After the blade has been welded, the weld area will
be very hard and brittle. Before the blade can be
used, it must be annealed and the flash removed.
• The blade weld is annealed by heating the blade
just under the melting temperature and then slowly
cooling the weld.
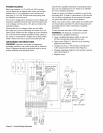
NOTE: Reset weld pressure adjustment knob to "0"
prior to annealing. Failure to do so can cause damage
to transformer.
• Press the anneal button until the weld area glows
a cherry red and then release the anneal button.
CAUTION: The blade weld will melt, destroying the
weld, if the anneal button is not released as soon as
the weld glows cherry red.
• Let the blade cool for several seconds.
• Press the anneal button again, but release the but-
ton before the weld glows as brightly as the first
time.
• Wait several seconds until the blade cools further.
• Repeat the anneal process 6 or 7 times, decreasing
the anneal temperature each time.
• The weld flash must be ground from the blade. See
"Grinding Blade".
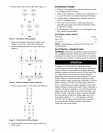
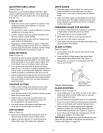
GRINDING BLADE
• After annealing the blade, the metal buildup or flash
must be ground from the blade.
• Toggle grinder switch to the ON position.
• Flip the grinder guard open, exposing the top of the
grinding wheel.
• Weld should be ground to same thickness as blade.
• Grind flash off underside of blade taking care not
to grind into blade.
• Turn blade inside out and grind other side of blade
same as first side (or, flip the grinder guard to the
closed position and use the bottom of the wheel).
• Take care not to grind into blade.
• Turn blade inside out again (to original shape).
• Turn grinder off when grinding is completed. The
blade must be annealed again.
ANNEAL BLADE AFTER GRINDING
• After flash has been removed, anneal the blade a
second time. The weld may have been hardened
by heat created during grinding. Repeat "Blade
Annealing" step.
• After second blade annealing operation, the blade
is ready for installation onto band saw. Follow band
saw instruction when installing and adjusting blade.
WARNING: Make certain that unit is disconnected
from power source before attempting to service or
remove any component.
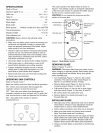
CLEANING
Refer to Figure 15.
• Keep machine and workshop clean. Do not allow
sawdust to accumulate on band saw.
• Keep wheels clean. Debris on wheels will cause
poor tracking and blade slippage.
• Keep mechanisms and threaded or sliding surfaces
clean and free of foreign particles.
• Operate band saw with a dust collector to minimize
clean up.
• Make sure that brush (Key No. 63) is in contact with
blade to properly remove foreign particles from
drive wheel.
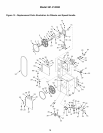
LUBRICATION
Refer to Figures 15-17.
• The shielded ball bearings are permanently lubricat-
ed and require no further lubrication.
• Grease guide post (Figure 16, Key No. 36) once a
week. Grease speed operator shaft in gearbox hous-
ing (Figure 15, Key No. 28 and 45) and blade tension
lead screw (Figure 15, Key No. 16) every 100 hours.
Use grease gun on grease fitting every 100 hours
(Figure 17, Key No. 10). Grease table support
brackets every three months.
• Add light machine oil or air tool oil to air pump
(Figure 17, Key No. 49) when pump loses power
or fails to pump air.
• Occasionally apply a coat of paste wax to table
top to keep it slick and corrosion free.
KEEP BAND SAW IN REPAIR
• If power cord is worn or cut in any way, have it
replaced.
• Replace V-belt and blade when they are worn.
Replace any damaged or missing part.
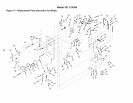
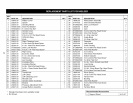
• Use parts list to order parts.
CLEAN WELDER JAWS
After each welding operation, wipe welder jaws clean
of any oil, dirt or rust and scrape any flash deposited
on welder jaws.
Welder jaws must be kept clean at all times. The jaws
must be wiped clean of any dirt or oil and scraped
clean of flash after each weld.
The shear blades should be wiped with an oily cloth
to remove any dirt or rust.
To replace grinding wheel, remove two screws holding
grinder guard and remove guard. Hold grinding wheel
stationary and remove nut and washer. Install new wheel
on grinder motor shaft and fasten with washer and nut.
Make sure nut is tight. Attach grinder guard with two screws.
11