


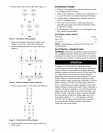

TENSIONING BLADE
Refer to Figure 15.
• Tension blade by rotating handwheel (Key No. 38). Be
sure blade guides do not interfere with blade path.
• Tighten blade until it is properly tensioned.
• A properly tensioned blade will ring slightly when back
of blade is plucked (like a string on an instrument).
NOTE: Check tension of new blade. Additional tension
may be required after a few minutes of operation.
TRACKING BLADE
Refer to Figure 15.
• Track blade after it has been tensioned. A change
in blade tension will affect wheel alignment. Proper
tracking is achieved when upper and lower wheels
are aligned.
• Set screws (Key No. 23) are used to align the track-
ing bracket to the saw frame.
• Turn idler wheel (Key No. 5) by hand and observe
how blade rides on the wheels.
• If blade rides away from the cabinet, tilt wheel up by
turning knob (Key No. 30) clockwise.
• If blade rides into cabinet, tilt wheel down by turning
knob counterclockwise.
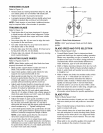
ADJUSTING BLADE GUIDES
Refer to Figures 8 and 16.
NOTE: Adjust blade guides only after blade has been
properly tensioned and tracked.
• Blade guides support blade at sides and rear of
blade, and prevent twisting or deflection.
• Upper blade guides employ guide blocks for side
support and a grooved bracket at rear.
• Blade guide bracket (Key No. 20) should be posi-
tioned so guide blocks (Key No. 21) on either side
of blade will support as much of blade width as
possible without interfering with the tooth set.
• Adjust guide bracket depth by loosening set screw
(Key No. 40) and sliding bracket into position. Secure
position of bracket by tightening set screw.
• Loosen bolts (Key No. 24) and adjust guide blocks
(Key No. 21 ) to sides of blade. Use a feeler gauge to
check that guide blocks are 0.002" away from blade.
• Lock adjustment by tightening bolts.
• Adjust the height of upper guide assembly to clear
the workpiece by 1/4".Loosen locking knob (Key
No. 30) and use handle (Key Nos. 37 and 38) to
slide guide bar down until the upper guide assembly
clears workpiece by 1/4".Tighten locking knob.
• Lower blade guides employ two guide blocks for side
support. Lower guide bracket is spaced close to table
surface to minimize unsupported length of blade.
NOTE: Lower blade guard (Key No. 56) must be
removed to adjust lower blade guides.
• Loosen bolts (Key No. 26) to adjust lower guide
bracket (Key No. 19) so guide blocks do not interfere
with blade set. Loosen socket head bolts (Key No. 24)
for guide blocks (Key No. 21) and adjust guide blocks
to 0.002" from each side of blade.
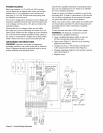
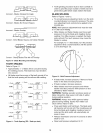
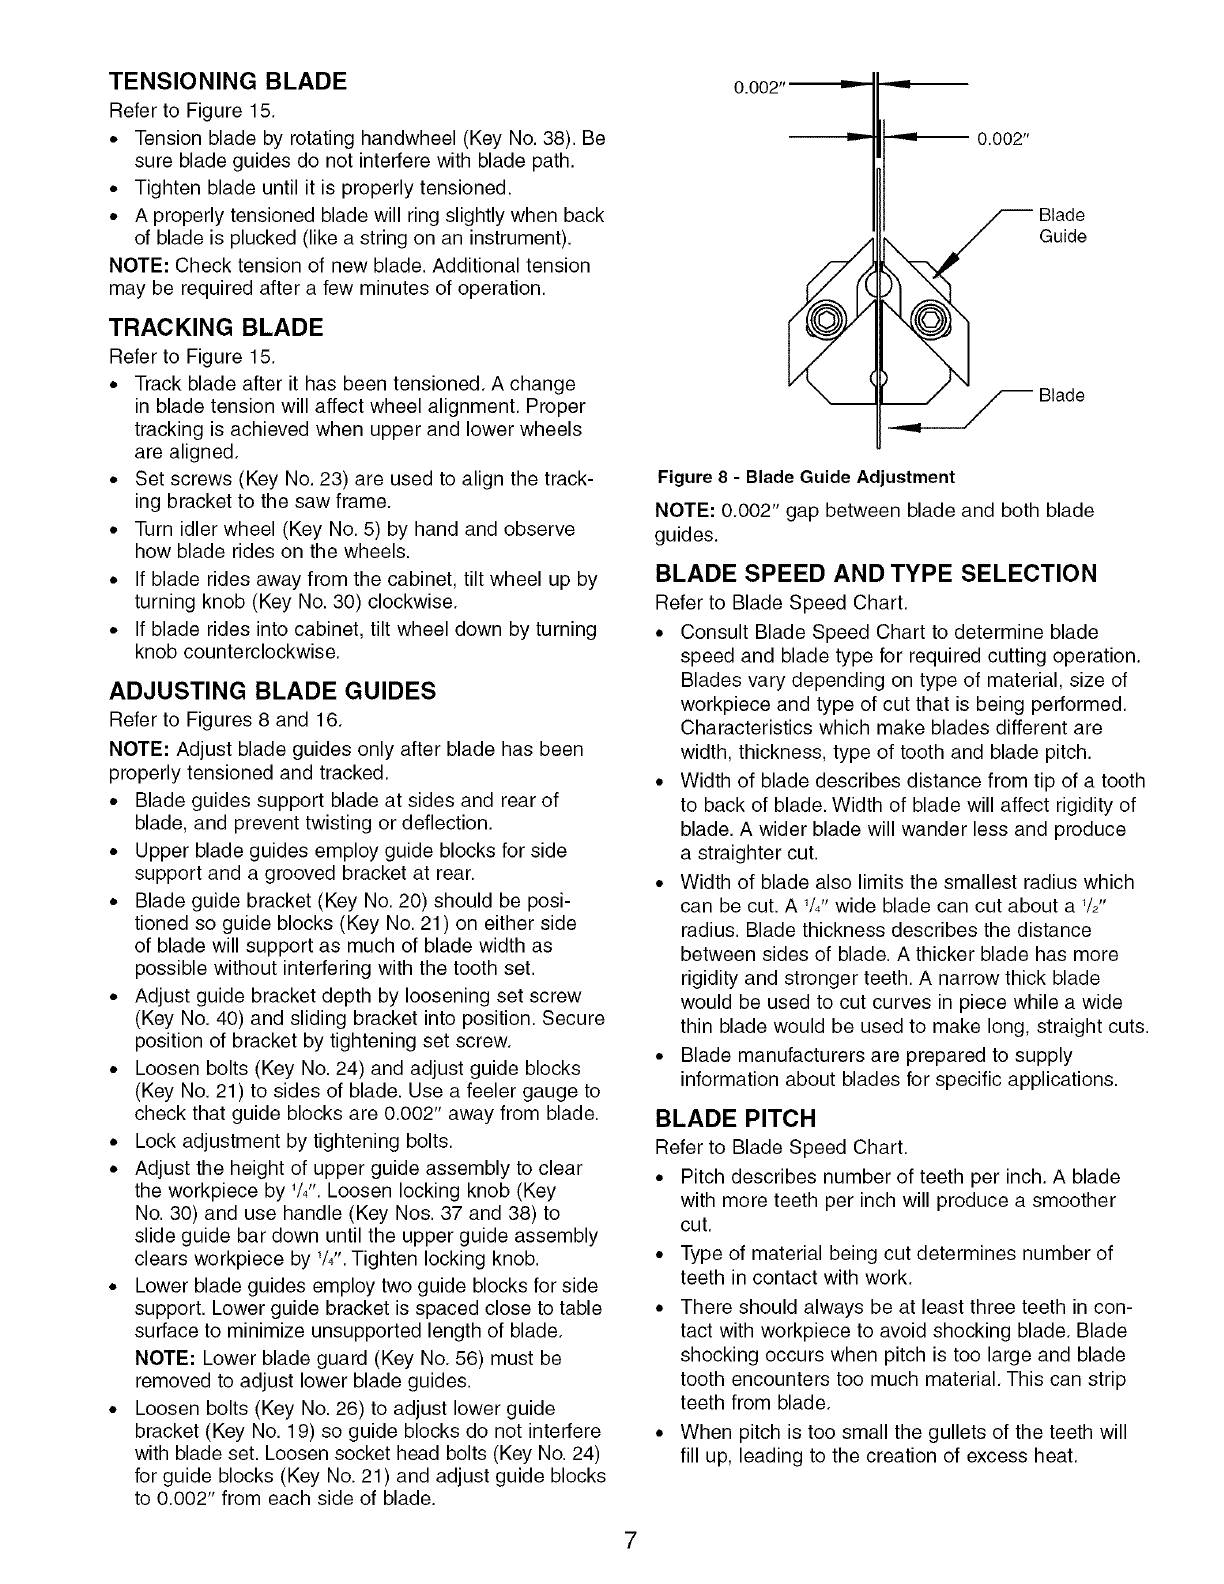
0.002"
0.002"
Blade
Guide
Blade
Figure 8 - Blade Guide Adjustment
NOTE: 0.002" gap between blade and both blade
guides.
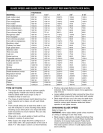
BLADE SPEED AND TYPE SELECTION
Refer to Blade Speed Chart.
• Consult Blade Speed Chart to determine blade
speed and blade type for required cutting operation.
Blades vary depending on type of material, size of
workpiece and type of cut that is being performed.
Characteristics which make blades different are
width, thickness, type of tooth and blade pitch.
• Width of blade describes distance from tip of a tooth
to back of blade. Width of blade will affect rigidity of
blade. A wider blade will wander less and produce
a straighter cut.
• Width of blade also limits the smallest radius which
can be cut. A 1/Z'wide blade can cut about a 1/2"
radius. Blade thickness describes the distance
between sides of blade. A thicker blade has more
rigidity and stronger teeth. A narrow thick blade
would be used to cut curves in piece while a wide
thin blade would be used to make long, straight cuts.
• Blade manufacturers are prepared to supply
information about blades for specific applications.
BLADE PITCH
Refer to Blade Speed Chart.
• Pitch describes number of teeth per inch. A blade
with more teeth per inch will produce a smoother
cut.
• Type of material being cut determines number of
teeth in contact with work.
• There should always be at least three teeth in con-
tact with workpiece to avoid shocking blade. Blade
shocking occurs when pitch is too large and blade
tooth encounters too much material. This can strip
teeth from blade.
• When pitch is too small the gullets of the teeth will
fill up, leading to the creation of excess heat.