


13
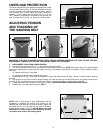
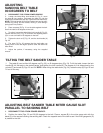
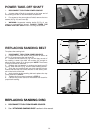
ADJUSTING SANDING DISC GUARD
1. DISCONNECT TOOL FROM POWER SOURCE.
2. Adjust the sanding disc guard (A) Fig. 35, so that the front edge of the guard is slightly in front of the sanding disc for small
work, and slightly behind the sanding disc for large work.
3. To adjust, move the guard (A) Fig. 35 in or out as required. The screws do not have to be loosened.
ACCESSORY HOLDER
An accessory holder (Fig. 36) is provided to store various accessories.
Fig. 35
Fig. 36
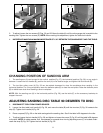
CIRCLE SANDING ATTACHMENT
A circle sanding attachment is supplied with the sander. It enables the operator to sand circles up to 24" in diameter. Follow
the guidelines below to attach and operate the circle sanding attachment.
1. DISCONNECT TOOL FROM POWER SOURCE.
2. Insert the stop block (A) Fig. 37 into the slot in the sanding disc table. Line up the end of the outside edge (B) of the block
to the diameter of the circle shown on the scale. Tighten the screw in the stop block with the supplied wrench (C) to hold the
block (A) in place.
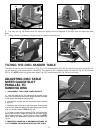
3. Insert the guide pin (D) Fig. 38 into the center of the oversized rough cut circle (E).
4. Insert the guide pin (D) Fig. 38 into the slot (F) of the disc sander table. Rotate the workpiece (E) Fig. 39. continuously while
sanding. A correctly sized circle is sanded when the guide pin (D) Fig.38 contacts the stop block, (A).
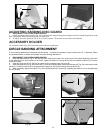
5. When necessary, adjust the scale (F) Fig. 40 by loosening the two screws (G), adjusting the scale in or out, and tightening
the two screws.
Fig. 37
Fig. 38
Fig. 39
Fig. 40
A
C
A
D
E
F
F
G
B