


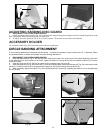

7
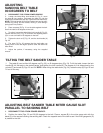
Fig. 9
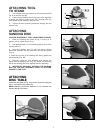
ATTACHING
SANDING DISC
CAUTION: DISCONNECT TOOL FROM POWER SOURCE.
1. Clean the sanding disc plate (A) Fig. 9 of any oil or
grease, and be certain that it is dry.
2. Peel approximately 1/2 of the backing (B) Fig. 9 from the
sanding disc (C).
3. Insert the sanding disc (C) with the paper backing
downward between the disc assembly and the disc guard
(Fig. 9).
4. Press the top half of the sanding disc firmly against the
disc assembly (Fig. 9B).
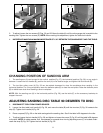
5. Manually rotate the disc assembly and remove the
paper from the sanding disc (Fig. 9C). Press the remaining
half of the sanding disc firmly against the disc assembly.
6. IMPORTANT: SECURELY POSITION THE SANDING
DISC ON THE DISC ASSEMBLY PRIOR TO APPLYING
POWER TO THE TOOL.
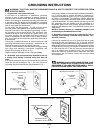
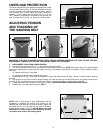
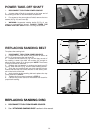
Fig. 8
ATTACHING TOOL
TO STAND
1. Use a helper to lift and position the tool and top shelf (A)
Fig. 8 on the four legs (B).
2. Fasten the top shelf to the six top holes in the legs (four
of which are shown). Insert the six 5/8" carriage bolts (C),
then attach the flat washers, and hex nuts.
3. Tighten all stand mounting hardware, starting with the
bottom nuts.
Fig. 9B
Fig. 9C
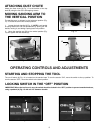
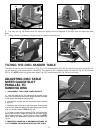
ATTACHING
DISC TABLE
Attach the disc table (A) Fig. 10 to the two trunnions using the
four 1" hex socket cap screws (B).
NOTE: Maintain a maximum distance of 1/16" between the
sanding belt and the table.
Fig. 10
A
B
C
C
A
B
C
A
B