


9
Fig. 17
Fig. 16
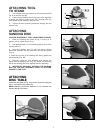
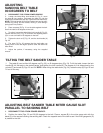
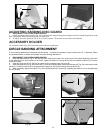
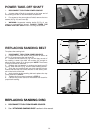
IMPORTANT: THE TOOL IS SHIPPED WITHOUT BELT TENSION. BEFORE OPERATING THE TOOL, ADJUST THE BELT
FOR CORRECT TENSION AND PROPER TRACKING BY DOING THE FOLLOWING:
1. DISCONNECT TOOL FROM POWER SOURCE.
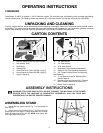
2. Loosen the two lock knobs (A) Fig. 17, and remove the top cover (B).
3. Turn the belt tension lever (C) Fig. 18 clockwise to increase the belt tension. NOTE: The tension lever (C) is spring-loaded
and can be repositioned by pulling out the handle, moving it, and letting it spring back into position. Correct tension is deter-
mined by:
(1) flatness of the belt on the plate.
(2) slippage of the belt when sanding heavy work.
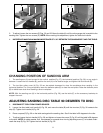
4. Rotate the belt (D) Fig. 19 by hand, and tighten or loosen the tracking knob (E) Figs. 18 and 19 until the belt is tracking
correctly.
5. Turn the tool on and off to check for proper tracking. If the belt is leading to one side or the other, very gently turn the track-
ing knob (E) Fig. 18 clockwise to move the belt to the right or counterclockwise to move the belt to the left.
6. A final adjustment can be made with the motor running. THIS ADJUSTMENT SHOULD BE VERY SLIGHT.
7. Replace top cover that was removed in STEP 1.
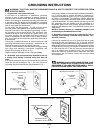
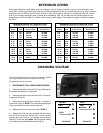
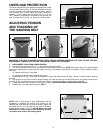
OVERLOAD PROTECTION
The motor supplied with your sander is equipped with a reset
overload relay button (A) Fig. 16. If the motor shuts off or fails
to start because of overloading (sanding too heavy, using a
worn sanding belt or disc, using the sander beyond its
capacity), or low voltage, turn the switch (A) Fig. 14 to the
“OFF” position. Let the motor cool three to five minutes and
push the reset button (A) Fig. 16. The motor will then start.
A
A
B
Fig. 18
Fig. 19
C
E
E
ADJUSTING TENSION
AND TRACKING OF
THE SANDING BELT
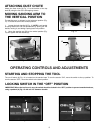
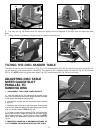
NOTE: After a long period of time, adjustments may be
necessary to maintain the tension and tracking of the
sanding belt. If the belt will not hold its tension, tighten the
set screw (G) Fig. 20. If the belt will not hold its tracking,
tighten the set screw (F) Fig. 20. NOTE: Make only small
adjustments to these screws. Over-tightening will lock
the tension lever and/or the tracking knob.
Fig. 20
F
G