


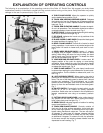


16
Fig. 37
Fig. 38
Fig. 39
Fig. 40
REMOVING “HEELING”
IN SAW BLADE CUT
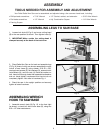
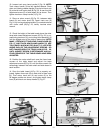
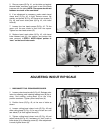
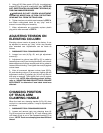
Even though the cutting-head travel may be perfectly
aligned at 90 degrees to the fence, the blade itself may
not be 90 degrees or square with the fence, as shown in
Fig. 37. This condition is known as “heeling.”
To check and adjust, proceed as follows:
1. DISCONNECT TOOL FROM POWER SOURCE.
2. Install saw blade without guard.
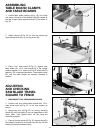
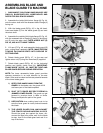
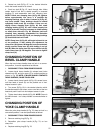
3. Replace the fence with a flat piece of 3/4″ wood (A)
Fig. 38, at least 5″ high. Tighten table board clamps.
4. Place three identical pieces of wood (B) Fig. 38, on
the table and lay a framing square on them so that the
short arm is flush against the fence and the long arm is
against the blade as shown. Be sure square is between
the teeth of the blade.
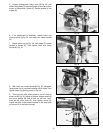
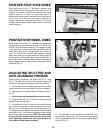
5. If the blade is not parallel to the square, an
adjustment is necessary. Release the yoke clamp handle
(C) Fig. 39, and slightly loosen two hex head screws (D).
Swivel the yoke until the blade is parallel with the square
and tighten yoke clamp handle (C). Then tighten two hex
screws (D) Fig. 39.
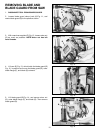
CHECKING AND ADJUSTING
SAW BLADE SQUARE
TO TABLE
1. DISCONNECT TOOL FROM POWER SOURCE.
2. Assemble the inner blade flange, saw blade, outer
blade flange, and arbor nut on saw arbor.
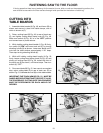
3. Place the cutting-head in a cross-cut position as
shown in Fig. 41. Lower track arm until the saw blade is
just clear of the table and slide the cutting-head forward
until it is positioned over the front table board; clamp the
cutting-head in position as shown in Fig. 41.
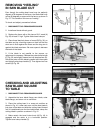
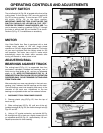
4. Make certain the bevel index knob (A) Fig. 40, is
engaged and the motor is in a horizontal position.
Tighten bevel clamp handle (C).
A
B
B
C
D
E
A
C
F
F
B