


English
molding positioned in the saw, cut off the molding at 90°
approx. 1" (25.4mm) longer than your final length then make
the miter cut as described below.
TO CUT AN INSIDE CORNER JOINT:
Cut the left side:
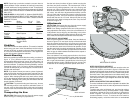
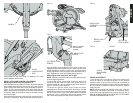
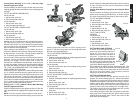
1. Position molding with bottom of molding against the base
of the saw as shown in figure 23.
2. Set the miter at 45˚ left.
3. Save the left side of the cut.
Cut the right side:
1. Position molding with top of the molding resting on the
base of the saw.
2. Set the miter at 45˚ left.
3. Save the left side of the cut.
TO CUT AN OUTSIDE CORNER JOINT:
Cut the left side:
1. Position molding with bottom of molding against the base
of the saw.
2. Set the miter at 45˚ right.
3. Save the left side of the cut.
Cut the right side:
1. Position molding with top of the molding against the base
of the saw
2. Set the miter at 45˚ right.
3. Save the left side of the cut.
Cutting Base Molding up to 4-1/4" (108 mm) High
Vertically against the Fence
Position molding as shown in figure 22 with the back of the
molding against the fence and bottom of the molding against
the base.
TO CUT AN INSIDE CORNER JOINT:
Cut the left side:
1. Set the miter at 45° left.
2. Save the left side of the cut.
Cut the right side:
1. Set the miter at 45˚ right
2. Save the right side of the cut
TO CUT AN OUTSIDE CORNER JOINT:
Cut the left side:
1. Set the miter at 45˚ right.
2. Save the left side of the cut.
Cut the right side:
1. Set the miter at 45˚ left.
2. Save the right side of the cut.
Material up to 4-1/4" (108mm) can be cut as described above.
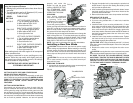
For wider boards [up to 5.25" (133mm)] the procedure is
different in two ways. First, you must raise the guard to begin
the cut. Second, you must position the workpiece so that it
does not interfere with the gearcase.
When cutting a board between 4-1/4" (108mm) and 5-1/4"
(133mm) in width the roller on the tip of the guard will hang up
on the workpiece. To avoid this, raise the guard to begin the
cut. To raise the guard, follow these directions.
Use one hand to roll the guard up out of the way as shown in
figure 24. Trap the guard with the index finger of the hand
operating the trigger. Use the other hand to hold the
workpiece at a safe distance from the blade. Avoid doing this
as much as possible. However, the saw will operate properly
and make the deeper cut with the guard rolled up. NEVER
TIE, TAPE, OR OTHERWISE HOLD THE GUARD OPEN
WHEN OPERATING THIS SAW.
When mitering to the right side of a base molding wider than
4-1/4" (108mm) standing vertically against the fence as in
Figure 24, the saw can only cut through the board up to 1 inch
from the end of the board. Trying to cut more than an inch
will cause the saw’s gear case to interfere with the workpiece.
If you want to cut base molding between 4-1/4" (108mm) and
5-1/4" (133mm) wide vertically, avoid the interference of the
gear case by following the directions below.
Cutting 4-1/4"– 5-1/4" (108mm-133mm) Base Molding
Vertically Against the Fence
Position molding with the back against the fence. Either the
top or the bottom of the molding will be against the base of the
saw.
NOTE: If the cut must be made somewhere other than 1"
(25.4mm) from the right end of the molding as you look at the
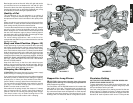
A third method of cutting wide boards (figure 25) is to make a
0˚ miter, 45˚ bevel cut. Your saw can cut a bevel in a board
12" (305mm) wide.
Cutting Base Molding Laying Flat and Using the Bevel
Feature
Position the back of molding laying flat on the saw and the
bottom of the molding against the fence, as shown in figure
25. make all cuts with the saw set at 45° bevel and 0˚ miter.
TO CUT AN INSIDE CORNER:
Cut the Left side:
1. Set the bevel at 45˚ right.
2. Save the right side of the cut.
Cut the right side:
1. Set the bevel at 45˚ left.
2. Save the left side of the cut.
TO CUT AN OUTSIDE
CORNER:
Cut the left side:
1. Set the bevel at 45˚ left.
2. Save the right side of the cut.
Cut the right side:
1. Set the bevel at 45˚ right.
2. Save the left side of the cut.
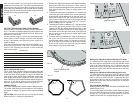
CUTTING MOLDING RETURNS
A “return” is cut to finish the end of a
chair rail or base molding as shown in
figure 26. This piece is a form of
outside miter cut in which one piece is
very short. To make this cut, place a
piece of molding with a square cut end
into the saw. Set the miter angle to 45˚
left. Slowly pull the blade through the
molding, stopping before the piece is
cut through. Before stopping the motor,
lift the sawhead up slightly and then release the trigger. This
will leave the “return” still connected to the molding by a small
piece of wood. Remove the wood from the saw and break
the return from the molding. This procedure prevents
chipping of the small piece of molding.
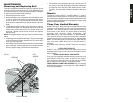
CUTTING CROWN MOLDING
Crown molding must be cut with extreme accuracy to fit
properly. On crown molding (figure 27) , the two flat surfaces
designed to fit against the ceiling and the wall are milled in
complementary angles to the front of the molding. Comple-
mentary angles, when added together, equal exactly 90°. In
most crown molding, the surface that fits flat against the
ceiling and the back of the molding form an angle of 52˚.
The bottom surface that fits flat against the wall and the
back of the molding form an angle of 38˚.
Your sliding compound miter saw has special pre-set miter
latch points at 31.6 degrees left and right for cutting crown
molding flat at the proper angle. There is also a mark on the
bevel scale at 33.9 degrees.
FIG. 22
FIG. 23
FIG. 24
11
Molding
Return
FIG. 26
FIG. 25