


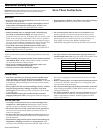


Systainer (System Container)
Every Festool product is shipped in its own unique system container, called a "Systainer". This provides protection
and storage for the tool and accessories. All Systainers are stackable and can be interlocked together, including
stacking and locking atop Festool dust extractors.
Instruction Manual 7
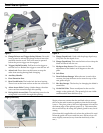
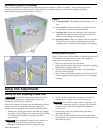
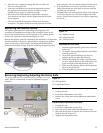
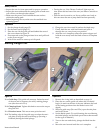
Figure 6
6-a Carrying Handle. The handle folds flat when not in
use.
6-b Cover Latches. These secure the cover and also secure
one systainer to another as described below.
6-c Stacking Tabs. These are used to lock two systainers
together. There are four sets of tabs (two on the front
and two on the sides) of each systainer.
6-d Stacking Latches. These are similar to the cover latches,
but they serve the purpose of latching onto the side
stacking tabs of a systainer stacked above the systainer.
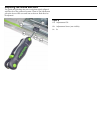
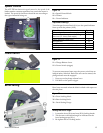
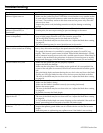
Stacking Systainers (Figure 7)
Figure 7 shows how the four latches (2 stacking latches and 2
cover latches) are repositioned so they will engage the
stacking tabs of the upper systainer.
1. Place one systainer on top of the other.
2. Release all four latches on the lower systainer by pulling
back at their top edges (step 7-1).
3. Slide all four latches upward (step 7-2) as depicted by
the two views of figure 7.
4. Snap all four latches back to their flat position (step 7-3)
so they engage the stacking tabs (item 6-c) of the upper
systainer.
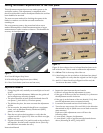
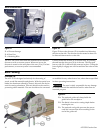
Setup and Adjustments
Setting up and Adjusting a New Saw
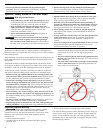
!WARNING: Always disconnect the saw from the power
supply before making any adjustments to the saw or
installing or removing any accessory!
Follow this sequence of inspections and adjustments before
using a new saw. It is important that this sequence be
followed before cutting the zero-clearance splinter guard.
1. With the saw unplugged, inspect the blade for damage
and make sure it is properly secured to the arbor. (Refer
to "Changing the Sawblade" on page 12 for more
information).
!WARNING: Check regularly whether the saw blade is in
good condition. Saw blades which are cracked,
damaged, or deformed should no longer be used.
2. Verify that the riving knife is properly secured and
adjusted (refer to page 11 for more information).
!CAUTION: The ATF 55 E is fitted with a riving knife. All
saw work, with the exception of plunge cuts, should be
carried out only with the riving knife installed and
correctly set!
3. Perform the guide rail gib adjustment procedure
described on page 8.
4. Only after all other inspections and adjustments have
been completed, cut the zero-clearance splinter guard as
described on page 8.