


20 OF 1400 EQ Router
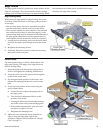
Alternative Method for Using the Guide Rail Attachment
This procedure can be used for greater stability of the
gui
m
rou or
whe
true
The
adjustment thumbwheel is used to adjust the inner and
out
la
(ref
gibs
Note that the micro-adjustment feature cannot be
used with this setup. If you need to use the micro-
adjustment feature to set the router's position, use
the procedure on page 19.
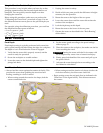
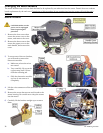
1. Clamp the guide rail to the workpiece. Note that the
cutting action of the router bit may tend to move the
guide rail if it is not properly clamped.
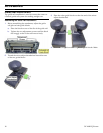
2. Place the router and guide rail attachment on the
guide rail with both guide blocks on the ribs of the
guide rail.
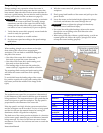
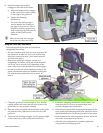
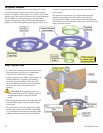
3. Use the micro-adjust thumbwheel to adjust the guide
blocks to fit the guide rail.
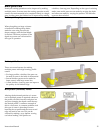
► The interior edges have a larger bearing surface, so moving
the two guide blocks apart makes the guide more stable.
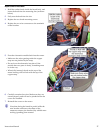
a. Loosen the clamping knob on the inner guide block.
b. Move the two guide blocks apart by turning the micro-
adjust thumbwheel toward the increasing numbers,
until the guide blocks fit snuggly to the guide rail ribs,
but not so tight that the guide doesn't slide freely.
c. Re-tighten the clamping knob.
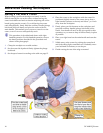
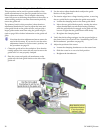
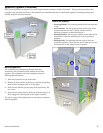
4. Verify that the leveling outrigger is at the proper height so
the router base is level (refer to the "Assembling the Guide
Rail Attachment" procedure on page 18).
5. Adjust the position of the router.
a. Loosen the clamping thumbscrew on the router base.
b. Slide the router in or out to its final position.
c. Retighten the thumbscrew.
de rail attachment, but does not permit the use of the
icro-adjustment feature. This is helpful when using
ter bits prone to deflecting the position of the router,
n making precision cuts that must remain perfectly
to the guide rail.
primary basis for this procedure is that the micro-
er guide blocks to the guide rail ribs, and provide a
rger guide surface area than using the guide rail gibs
er to page 18 for further information on the guide rail
).