


Gun Setup
GunGun
Gun
SetupSetup
Setup
GunGun
Gun
SetupSetup
Setup
ChecklistChecklist
Checklist
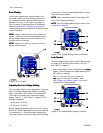
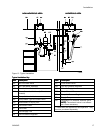
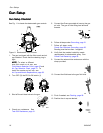
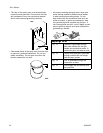
See Fig. 11 to locate the electrostatic gun controls.
Figure 11 Electrostatic Gun Controls
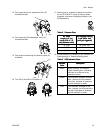
1. The gun is shipped with the uid nozzle and air
cap installed. Check that the retaining ring is
tight.
NOTE:NOTE:
NOTE:
To select a different
size uid nozzle or air cap, see
Fluid Nozzle Selection Chart, page 68 and
Air Cap Selection Chart, page 70. To
install the nozzle and air cap, see
Air Cap and Nozzle Replacement, page 38.
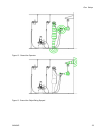
2. Turn OFF (O) the ES On-Off switch (J).
3. Shut off the air bleed valve to the gun.
4. Check gun resistance. See
Test Gun Resistance, page 31.
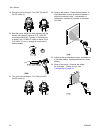
5. Connect the Graco grounded air hose to the gun
air inlet. The gun air inlet tting has left-hand
threads.
6. Follow all steps under Grounding, page 21.
7. Follow all steps under
Check Gun Electrical Grounding, page 25.
Reading must be less than 1 megohm.
8. Verify that the material resistivity meets
requirements for electrostatic spray. See
Check Fluid Resistivity, page 26.
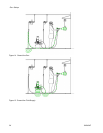
9. Connect the exhaust tube and secure with the
clamp provided.
10. Connect the uid hose to the gun uid inlet.
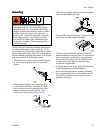
11. Flush if needed, see Flushing, page 28.
12. Position the air cap as desired.
183A2494D