


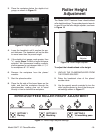

Model G0477 15" Planer/Moulder
-17-
Note: If the cut is too heavy and bogs down
the planer/moulder, turn the planer/moulder
OFF immediately, allow it to come to a com-
plete stop, remove the workpiece, and repeat
Steps 3–5
.
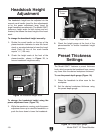
6. Measure your workpiece thickness and adjust
the headstock height as necessary to take a
lighter or heavier pass, depending on your
needs.
Operation Tips
• Inspect lumber for defects, warping, cup-
ping, twisting, and for foreign objects (nails,
staples, imbedded gravel, etc,). If you have
any question about the quality of your lum
-
ber, do not use it. Remember, wood stacked
on a concrete floor can have small pieces of
stone or concrete pressed into the surface.
• Use the full width of the planer/moulder.
Alternate between the left, the right, and the
middle when feeding lumber into the planer/
moulder. Your cutters will remain sharp much
longer.
• Scrape all glue off joined boards before plan-
ing.
• Plane ONLY natural wood fiber. DO NOT
plane MDF, plywood, laminates, or other
synthetic products.
• Plane wood with the grain. Never feed
end-cut or end-grained lumber into your
planer/moulder.
• Do not use boards with loose or large knots,
splits, crossgrain or other obvious blemishes
or defects. They can damage the machine
and pose the possibility of operator injury.
• Keep your work area clear.
• When making multiple passes on long stock,
use the stock return rollers on the top of the
machine to move the material back to the
infeed side of the machine.
• Avoid planing wood with a high water con-
tent. Wood with more than 20% moisture
content or wood exposed to excessive mois
-
ture (such as rain or snow), will plane poorly
and cause excessive wear to the cutters and
motor. Excess moisture can also hasten rust
and corrosion of the planer/moulder and/or
individual components.
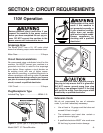
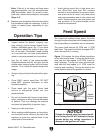
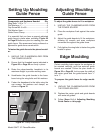
Feed Speed
The infeed and outfeed rollers power the stock
through the planer/moulder while keeping boards
flat and providing a consistent rate of movement.
The power feed features 22 FPM and 11 FPM
feed rates. The speed should be changed ONLY
when the machine is running.
Figure 11 illustrates the three different positions
of the feed control knob.
Turning the knob clock-
wise sets the feed speed to 22 FPM (used for
rough planing). Turning the knob counterclock
-
wise sets the feed speed to 11 FPM (used for
finishing and moulding). Turning the knob to the
center position places the gearbox in neutral.
NOTICE
Change the speeds when the planer/mould-
er is running, but DO NOT attempt to change
speeds during any cutting operations or
damage to the gearbox will result.
Figure 11. Feed control knob positions.
22
FPM
11
FPM
Neutral
Speed
Indicator
Arrow