


-28-
Model G0477 15" Planer/Moulder
Changing Belts
Tools Needed: Qty
Hex Wrench 4mm ..............................................
1
Hex Wrench 5mm ..............................................
1
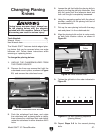
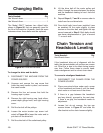
The Model G0477 features two ribbed belts,
shown in
Figure 26, that are generally good for
the life of the machine. However, there are some
instances where these belts must be replaced.
To change the drive and fan belts:
1. DISCONNECT THE MACHINE FROM THE
POWER SOURCE!
2. Unscrew and remove the cap screw that
holds the crank handle in place, and remove
the crank handle.
3. Remove the four set screws that hold the
housing caps in place.
4. Remove the right housing cap, feed rollers,
preset depth gauge knob, and right housing
cover.
5. Roll the fan belt off the pulleys.
6. Loosen the motor tension cap screw indi-
cated in
Figure 26 to lower the motor and to
put slack on the drive belt.
7. Roll the drive belt off the cutterhead pulley.
8. Lift the drive belt off the motor pulley and
slide it through the space between the pulley
and the headstock casting to free it from the
machine.
9. Repeat Steps 5, 7 and 8 in reverse order to
install new fan and drive belts.
10. Once both belts have been installed, have
an assistant lift the motor slightly to place
tension on the drive belt, and tighten the cap
screw loosened in Step 6. Both belts should
now have a displacement or "give" of around
1
⁄4" on each side.
Figure 26. Drive and fan belts.
Fan Belt
Drive Belt
Motor Tension Cap Screw
Tools Needed: Qty
Hex Wrench 4mm ..............................................
1
If the headstock slips out of alignment with the
table, the planer/moulder will produce an uneven
cut. Often this is due to the chain losing tension
over time. Follow these steps to correct head
-
stock misalignment and to correct chain slack.
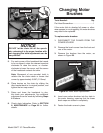
To correct a misaligned headstock:
1. DISCONNECT THE PLANER FROM THE
POWER SOURCE!
2. Place even-sized shims under each corner
of the headstock and lower it until the head
-
stock rests on at least one of the shims.
3. If there is a gap between the headstock
and any shim(s), proceed to the next step.
If there is no gap, the headstock needs no
adjustment.
4. Loosen, but do not remove, the two cap
screws shown in
Figure 27 and slide the
idler bracket so the chain loosens slightly
.
Chain Tension and
Headstock Leveling