


-18-
G0484 Gear Head Mill/Drill
6. Clear away all items from the cutter before
turning the mill/drill
ON.
To remove tooling from the spindle:
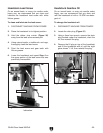
1. DISCONNECT MACHINE FROM POWER!
2. Return the headstock to the highest position
and loosen the drawbar.
3. Put on leather gloves, support the tool, and
unthread the drawbar approximately
three
turns.
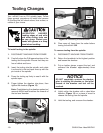
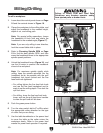
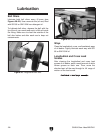
Figure
14. Unseating the arbor/cutter.
Drawbar
Nut
Tooling Changes
To install tooling in the spindle:
1. DISCONNECT MACHINE FROM POWER!
2. Carefully clean the R-8 tapered surface of the
tooling and the spindle. Ensure that they are
free of debris and burrs
.
3. Insert the tooling into the spindle, and rotate
it so the slot in the tool taper lines up with the
pin inside of the spindle.
4. Press the tooling up firmly to seat it with the
spindle taper.
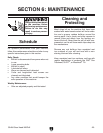
5. Finger tighten the drawbar into place, then
tighten the drawbar
(Figure 13).
Note: Overtightening the drawbar makes tool
removal difficult and stretches the threads of
the tool and drawbar.
NOTICE
DO NOT completely unscrew the drawbar
prior to striking the drawbar or the initial
threads of the drawbar and tool will be
crushed.
Your mill/drill has an R-8 spindle taper. Follow
these general procedures to install and remove
R-8 tooling like drill chuck arbors, face cutters, or
collets of your choice.
LACERATION HAZARD!
Leading edges of end mills
and other cutting tools can
be very sharp.
Protect your
hands with gloves or a shop
towel when handling.
Figure 13. Tightening drawbar.
4. Lightly strike the drawbar with a dead blow
hammer (Figure 14) or a piece of wood to
release the
tooling from the spindle.
5. Hold the tooling, and unscrew the drawbar.