


-16-
G0512 Edge Sander
Installing Table
To test run and track the belt:
1. Make sure the belt is properly pre-tracked as
described previously.
2. Tie back loose clothing and long hair to pro-
tect yourself from getting caught in the mov-
ing sanding belt when you start the machine.
3. Make sure the switch is in the down position
(OFF), then connect the sander to the power
source.
Use extreme caution when preparing for
your initial test run. Always keep one finger
on the switch in order to quickly STOP the
machine in the event of a malfunction or
incorrect belt tracking.
4. Start the sander; it should run smoothly with
little or no vibration or rubbing noises.
Strange or unnatural noises should be inves-
tigated and corrected before further opera-
tion.
— If noises occur that can not be found by
visual inspection, feel free to contact our
Service Department for help.
5. Using the tracking control knob, carefully
adjust the tracking higher or lower until the
top of the sanding belt remains even with the
top of the main roller. Note—The tracking
control knob is very sensitive, adjust it with
caution.
6. When the tracking appears to be correct,
allow the sander to run for approximately one
minute to verify that the tracking stays in the
correct position.
— If the tracking does not stay correct,
repeat steps 5 & 6.
7. When the sanding belt is tracking correctly,
tighten the tracking lock knob.
Before installing the table, the sanding belt must
be tracking correctly to ensure that the idler roller
is close to the position that it will be in during
operation.
To install the table:
1. Disconnect the sander from the power
source!
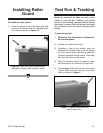
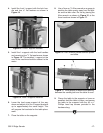
2. Insert the lead screw assembly as shown in
Figure 12.
Figure 12. Lead screw assembly installed in
bracket.
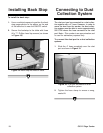
Figure 13. Table brackets laid out for
identification.
3. Identify the three table brackets in Figure 13
before continuing.
Front
Rear