-30-
G0512 Edge Sander
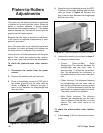
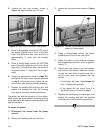
Figure 44. Idler roller adjustment cap screws.
4. Place a straightedge across the TOP part of
the platen graphite and in front of the idler
roller, and adjust the idler roller so that it is
approximately
1
⁄8" away from the straight-
edge.
5. Place a straightedge across the BOTTOM
part of the platen graphite and in front of the
idler roller, and adjust the idler roller so that it
is approximately
1
⁄8" away from the straight-
edge.
6. Check the adjustments made in steps 5-6,
and tighten the cap screws that you loosened
in step 3, making sure not to move the cor-
rected idler roller position during tightening.
7. Replace the sanding belt and dust port, and
retrack the sanding belt with the tracking
knob before resuming sanding operations.
The platen can also be adjusted, but this adjust-
ment should be done carefully because moving
the platen too far will make the sanding belt press
against the table.
To adjust the platen:
1. Disconnect the sander from the power
source!
2. Remove the sanding belt and dust port.
3. Loosen the two cap screws, shown in
Figure 44, approximately one full turn.
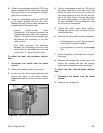
3. Loosen the two cap screws shown in Figure
45.
Figure 45. The two cap screws that secure the
platen for adjustments.
4. Place a straightedge across the platen
graphite and in front of the main roller.
5. Adjust the platen so the distance between
the straightedge and main roller is approxi-
mately
1
⁄8".
6. Tighten both cap screws in an even manner
and recheck the distance between the plat-
en and the main roller to make sure that it
did not move when you tightened the cap
screws.
— If the platen did move, repeat steps 3-5
until it is positioned properly.
— If the platen did not move, then it is
adjusted correctly. Proceed to step 7.
7. Replace the sanding belt and dust port, and
retrack the sanding belt with the tracking
knob before resuming sanding operations.


