


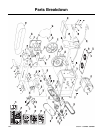

G0547 Combo Sander -19-
Never use the Model G0547 for applica-
tions other than those for which it was
made. DO NOT overload the machine or
use excess force when sanding. Severe
personal injury, damage to the machine,
or damage to your workpiece could
occur.
Always keep the workpiece on the side of
the wheel that is rotating down toward the
table. This will keep the workpiece from
flying out of your hands from the rota-
tional forces.
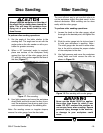
Miter Sanding
The most efficient way to get a perfect miter is to
cut the workpiece slightly long and sand it to the
desired dimension. Miter sanding can be done
easily with the miter gauge:
To perform miter sanding operations:
1. Loosen the knob on the miter gauge, adjust
the angle to the desired point, and tighten the
knob.
2. Slide the miter gauge into its slot and use it
to hold your workpiece in position. Note—
The miter gauge can be used in either direc-
tion in the slot to achieve the proper relation
of the workpiece to the disc.
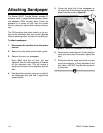
3. Use light pressure and move the workpiece
slowly back and forth across the disc as
shown in Figure 18.
Figure 18. Disc sanding with a miter gauge.
To perform disc sanding operations:
1. Set the angle of the table relative to the
sanding disc. The angle can be set with the
angle scale on the disc sander or with a pro-
tractor for greater accuracy.
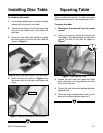
2. When a 90˚ horizontal angle is required,
place one surface of the workpiece firmly
against the face of the miter gauge (set at
0˚), with the other surface against the face of
the disc (Figure 17).
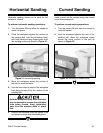
Figure 17. Disc sanding.
Disc Sanding
3. Use light pressure and move the workpiece
slowly back and forth across the disc to pre-
vent the workpiece from burning and to pre-
vent excessive loading of the sanding disc.
Note—For sanding curves or irregular shapes,
remove the miter gauge from the disc table.