


Model G0765 (Mfd. Since 5/15)
-33-
To mount center in tailstock:
1.
DISCONNECT MACHINE FROM POWER!
2.
Thoroughly clean and dry tapered mating
surfaces of tailstock quill bore and center,
making sure no lint or oil remains on tapers.
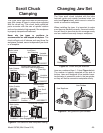
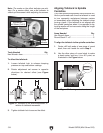
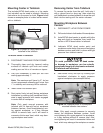
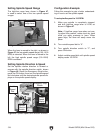
Mounting Center in Tailstock
The included MT#2 dead center or a live center
(not included) can be used in tailstock. Mounting
instructions are the same for both. Figure below
shows an example photo of a dead center mount-
ed in a tailstock.
Figure 38. Example of using dead center
installed in the tailstock.
Dead Center
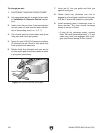
3. Use quill handwheel to feed quill out from
casting approximately 1".
Note: The maximum quill travel is 2", but we
do not recommend extending quill more than
1" or stability and accuracy will be reduced.
4. Insert center into tailstock quill.
5.
Seat center firmly into quill during workpiece
installation by rotating quill handwheel clock-
wise to apply pressure with center engaged
in center hole of workpiece.
Note: Only apply enough pressure with
tailstock quill to securely mount workpiece
between centers. Avoid overtightening cen-
ter against workpiece, or it may become
difficult to remove later, and it will result in
excessive friction and heat, which may dam-
age workpiece and center.
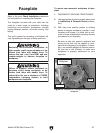
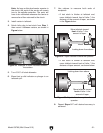
Removing Center from Tailstock
To remove the center from the quill, hold onto it
with a gloved hand or shop rag, then rotate the
quill handwheel counterclockwise to draw the quill
back into the casting until the center releases.
If the center does not come loose by retracting the
quill, extend the quill to expose the slot shown in
the Figure below, then use a drift key to remove
the center.
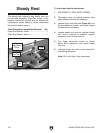
Mounting Workpiece Between
Centers
1. DISCONNECT LATHE FROM POWER!
2. Drill center holes in both ends of the workpiece.
3. Install MT#3 dead center in spindle with lathe
dog and chuck or faceplate, then install live
center or MT#2 dead center in tailstock.
4. Lubricate MT#2 dead center point and
workpiece center holes, then mount workpiece
between centers and hold it in place with light
pressure from tailstock center.
To avoid premature wear of dead center
or damage to workpiece, use low spindle
speeds and keep tip of dead center mounted
in tailstock well lubricated.
1. DISCONNECT LATHE FROM POWER!
2. Drill center holes in both ends of workpiece.
3. Install dead center in spindle with lathe dog
and chuck, faceplate or drive plate, then
install live center or carbide-tipped dead cen-
ter in tailstock.
4. Lubricate dead center point and workpiece
center holes, then mount workpiece between
centers and hold it in place with light pressure
from tailstock center.
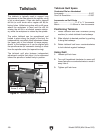
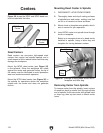
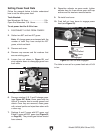
5. Seat center firmly into quill by rotating quill
handwheel clockwise to apply pressure
against workpiece (see example below).
Figure 39. Example photo of a workpiece
mounted between two centers.
Note: Only apply enough pressure to securely
mount the workpiece between centers. Avoid
over-tightening the center against the workpiece,
or it may become difficult to remove later. Also,
over-tightening will result in excessive friction and
heat, which may damage the workpiece or center.