


-18-
Model G0775 (Mfd. Since 11/14)
The Model G0775 sander accepts 20" diameter
PSA (pressure-sensitive adhesive) sanding discs.
These are available in a variety of grits. The sand-
paper can be replaced without removing the table.
To attach sandpaper:
1. DISCONNECT MACHINE FROM POWER!
2. Loosen six hex bolts that secure table to
support brackets, and move table away from
sanding disc.
3. Remove disc guard, peel off old sandpaper,
clean disc surface with mineral spirits, and
wipe it dry.
4. Peel back protective layer on one-half of
sandpaper disc and fold it against remaining
half.
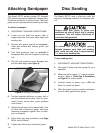
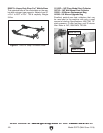
5. Slip half with protective layer between disc
and the table edge (see Figure 9).
Figure 9. Installing sandpaper.
6. Position exposed adhesive on upper half of
disc that extends above table. Once it is posi-
tioned evenly across disc, press adhesive
onto surface.
7. Rotate disc so lower half is above table. Peel
off other half of protective paper, and press
remaining sandpaper against disc so adhe-
sion is complete.
8. Adjust table gap and parallelism (see Page
26 for further details).
9. Tighten hex bolts and re-install disc guard.
Attaching Sandpaper
The Model G0775 uses a dual-axis miter slot
design for increased versatility of workpiece con-
trol.
Disc Sanding
To use sanding disc:
1. DISCONNECT MACHINE FROM POWER!
2. Set angle of table and miter gauge for your
operation.
3. Make sure table is about
1
⁄16" away from sand-
ing disc. Refer to Table Gap & Parallelism
on Page 26 for further details.
4. Connect sander to power, turn it ON, and
allow it to reach full speed.
5. With disc guard in place, position workpiece
on work table against miter gauge.
To reduce risk of your fingers getting
trapped between work table and sanding
disc, make sure the table is approximately
1
⁄16" away from sanding disc.
Always keep disc guard in place and
workpiece on side of wheel that is rotating
downward. This will reduce likelihood of
workpiece being ejected.