


-26-
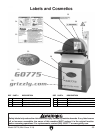
Model G0775 (Mfd. Since 11/14)
Calibrating Miter
Gauge
Table Gap &
Parallelism
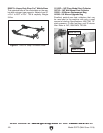
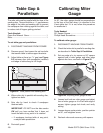
The miter slot must be parallel with the face of the
sanding disc. There should be a
1
⁄16" gap between
the edge of the table and sanding disc to prevent
the sandpaper from rubbing against the table, and
to reduce risk of fingers getting pinched.
Tools Needed:
Open-End Wrench 13mm .................................. 1
Ruler .................................................................. 1
To set table gap and parallelism:
1. DISCONNECT MACHINE FROM POWER!
2. Remove guard, then loosen the six hex bolts
that secure table to table support brackets.
3. Adjust table so there is a
1
⁄16'' gap (see Figure
24) between disc (with sandpaper installed)
and edge of table along its full length.
4. When miter slot is parallel with sanding disc,
tighten hex bolts.
5. Spin disc by hand to check if sandpaper
touches table.
IMPORTANT: DO NOT turn the disc sander
ON until you have verified that it does not
touch the table at any point in its rotation!
— If sandpaper touches table at any point,
re-adjust table parallelism.
6. Re-install guard.
Figure 24. Table parallel with sanding disc.
1
⁄
16
"
(Top View)
Sanding Disc
Table
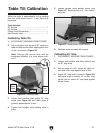
At 90˚, the miter gauge should be perpendicular
to the face of the disc when it is mounted in the
X-axis table slot. If it is not, follow this procedure
to recalibrate it.
Tools Needed:
90° Square Square ............................................ 1
Phillips Head Screwdriver .................................. 1
To calibrate miter gauge:
1. DISCONNECT MACHINE FROM POWER!
2. Check that miter slot is parallel to sanding disc
as described in Table Gap & Parallelism.
3. Set one edge of a try square or 90° square
against face of miter gauge and other edge
against disc face, as shown in Figure 25.
4. Loosen lock knob on miter gauge and adjust
face of miter gauge so it is flush with edge of
square, tighten gauge lock knob, and verify
setting.
5. Loosen degree scale pointer, position pointer
on 90˚, and retighten screw.
6. Recheck miter scale accuracy with square.
Figure 25. Squaring miter gauge to disc.