


-12- G1037 Planer / Moulder
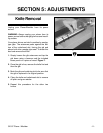
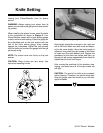
Knife height should be checked on the right and
left of the knife. Make sure both ends are adjust-
ed to the same height. Once the knife height is
adjusted, snug down the gib screws a little more
to make sure the knife doesn't shift. Repeat this
procedure for the other two knives and then, go
through all gib screws sequentially three times to
tighten them to their final torque.
After running the machine for five minutes, stop,
unplug, and make sure all of the gib screws are
still tight.
CAUTION: The end of the knife is very suscepti-
ble to chipping. Therefore, use caution when han-
dling the gauge near the knives or you will dam-
age the blades.
Figure 9. Adjusting the knives.
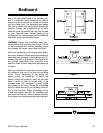
Figure 8.
Knife Setting
Unplug your Planer/Moulder from its power
source.
WARNING: Always unplug your planer from its
power source before changing knives and mould-
ing cutters.
When installing the planer knives, orient the knife
in the cutterhead as shown in Figure 8. Your
Planer/Moulder comes with a knife setting gauge
to aid in uniform knife setting. Place the gauge on
the cutterhead next to the jack screws with the
feet of the knife setting gauge firmly resting
against the cutterhead. Adjust the jack screws
until the knife just touches the gauge with the gib
just barely snug.
NOTE: The knives must rest firmly on the jack
screws.
CAUTION: Planer knives are very sharp. Use
care when handling knives.