


G1037 Planer / Moulder -13-
Figure 10.
Figure 12.
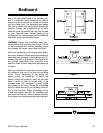
Bedboard
Due to the high relief nature of the moulding cut-
ters, it is essential that a bedboard be used to
ensure that the knives do not come into contact
with the planer bed. The bedboard also needs
side rails or fences to guide the stock through the
machine. Always use a bedboard so the knife
does not come into contact with the cast iron bed
of your Planer/Moulder. Before installing the
moulding knives, construct and install a bedboard
and fence system as described below.
WARNING: Always use a bedboard when oper-
ating a planer with moulding cutter knives. Failure
to use a bedboard with custom moulding knives
can damage the knives, planer bed and cutter.
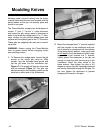
Make your bedboard out of dimensionally stable,
low friction material. Guides should be clamped in
place with bolts mounted in the bedboard or by C-
clamps. Size and or placement of the guides will
will change depending upon moulding knife
selection, width of stock and profile placement on
the stock.
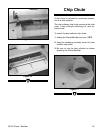
Once your bedboard is securely mounted, adjust
the guides so they are in line with the moulding
knives. Proper adjustment of the guides will
assure quality cut mouldings. To adjust the
guides, unplug the machine, lower the bed and
place a piece of stock of correct width to be
moulded under the cutterhead. Loosely adjust
your guides to the stock. Rotate the cutterhead
pulley by hand and see if the moulding knife will
line up with the stock. Adjust accordingly on the
infeed and outfeed side until the moulding knife
and stock are lined up. When properly adjusted,
firmly tighten the clamps securing the bed guides.
Figure 11.