


-18- G1037 Planer / Moulder
Adjusting Scale
For safe operation of your Planer/Moulder, it is
very important that the depth of cut scale is read-
ing accurately. To adjust the depth of cut scale,
follow the steps outlined below:
WARNING: Always unplug the Planer/Moulder
from its power source. Never perform mainte-
nance procedures on your Planer/Moulder until it
has been disconnected from its power source.
1. After all other adjustments have been made
and you have reviewed test run and safety
procedures and the Planer/Moulder is ready
for operation, try to feed a board for planing.
2. Compare the measured thickness of the
board to the reading on the depth of cut scale.
3. If the reading on the depth of cut scale is
incorrect, loosen the screw which tightens the
plastic pointer and adjust accordingly.
4. When you have properly adjusted the depth of
cut scale, test your reading by planning anoth-
er piece of lumber. After planing, measure the
planed thickness and double check it against
the scale reading. The two measurements
should be the same. If the measurements are
not the same, re-adjust your depth of cut
scale to read the planed thickness.
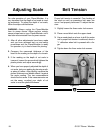
Belt Tension
Proper belt tension is essential. Poor feeding of
the stock as well as premature belt wear can
occur if not properly tensioned. To adjust the ten-
sion:
1. Slightly loosen the three motor lock screws.
2. Place a wood block onto the upper stand.
3. Use a wood plank as a lever to shift the motor
until a proper belt tension is achieved, about a
1
⁄
4'' deflection when belt is pressed with a fin-
ger.
4. Tighten down the three motor lock screws.
Figure 22.