


-12- G1847 / G1852 / G 1861 / G3811 Air Nailers/Staplers
O-Rings
Since the nailer is disassembled, inspect the con-
dition of the visible O-rings. If the O-rings show
signs of wear and tear, they should be replaced.
Inspect the surfaces where the O-rings seal for
any possible rough spots which will erode the
new O-rings. When replacing the O-rings, make
sure that there is no dirt or grit in the groove
where the O-rings seat. Do not stretch the O-
rings or nick them on any sharp edges or burrs. If
cleaning parts with a solvent, do not use a solvent
that may deteriorate the O-rings.
To re-assemble the nailer:
1. Before replacing O-rings, lubricate them with
a light grease that is non corrosive to rubber.
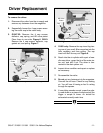
2. IMPORTANT: Carefully position the driver
tip into the plastic driver insert from the top of
the nailer. You may have to wiggle the driver
so the main piston seats into the cylinder.
G1861: the driver has a T-shaped cross sec-
tion and will only fit one way. If the driver is
not seating, do not force it. Remove the dri-
ver unit, rotate 180°, and try to reinstall it.
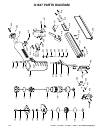
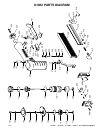
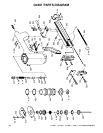
3. Replace the parts in the same order they
were removed. See the parts diagrams if
necessary. Tighten the cap screws sequen-
tially. If the cap screws are not tightened
evenly, the cap will not seat correctly, air
will leak, and the nailer will not function.
Ensure that the washers are installed
under the cap screw heads.
4. Check all bolts to make sure they are tight
and test the nailer to ensure that it works
properly.
5. Do not put any fasteners into the magazine.
Connect the air hose. Check for any leaking
air. You will hear it hissing or feel it rushing
through the spaces.
6. If everything sounds normal, press the safe-
ty nose down on a piece of wood and pull the
trigger a couple of times. Air should be
exhausted normally each time.
Failure to repair or replace damaged or
worn parts could result in poor performance
and additional damage to other compo-
nents of the gun. Take the time to make
repairs immediately, rather than nursing
along a damaged gun. Doing so will ensure
maximum performance and dependability.
DO NOT attempt to repair or service this
gun without ensuring that all nails or sta-
ples have been removed and that the gun is
disconnected from its air source. Use
extreme care when testing after freeing
jams or after re-loading. Always wear
approved safety glasses or goggles and
quality hearing protection when operating
pneumatic guns or other woodworking
tools and machinery. Failure to do so could
result in serious personal injury.