


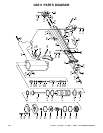

G1847 / G1852 / G 1861 / G3811 Air Nailers/Staplers -23-
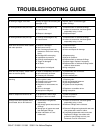
TROUBLESHOOTING GUIDE
Symptom Cause Solution
Air leaking at trigger valve area. O-Rings in trigger valve housing are Replace and/or re-lubricate trigger
damaged or dry. system O-Rings.
Air leaking between body and nose. 1. O-Rings are damaged or dry. 1. Replace and/or re-lubricate O-Rings.
2. Loose screws. 2. Loosen all screws first, and then tighten
sequentially using
1
/2 turns.
3. Bumper is damaged. 3. Replace bumper.
Air leaking between body and cap. 1. O-Rings are damaged or dry. 1. Replace and/or re-lubricate O-Rings.
2. Loose screws. 2. Loosen all screws first, and then tighten
sequentially using
1
/2 turns.
Nailer won’t shoot even when loaded 1. Bumper is damaged. 1. Replace bumper
and under pressure. 2. Nose piece is dirty. 2. Clean nose piece.
3. Dirt or damage prevents the 3. Clean and inspect for damage.
fasteners or driver from moving
freely.
4. Damaged HD valve spring. 4. Replace spring.
5. Inadequate air pressure. 5. Adjust air pressure.
6. O-Rings are damaged or dry. 6. Replace and/or re-lubricate O-Rings.
7. Trigger is damaged. 7. Inspect trigger. Replace if necessary.
8. Air leaks. 8. Replace and/or re-lubricate O-Rings and/or
check for loose screws.
9. Nosepiece is misaligned. 9. Align nosepiece.
Nails don’t set properly and/or nailer 1. Nailer is inadequately lubricated. 1. Disassemble and re-lubricate.
does not recover quickly. 2. HD valve spring is broken. 2. Replace spring.
3. Exhaust port is blocked. 3. Clean exhaust port.
Jamming. 1. Driver guide is worn. 1. Replace guide.
2. Fasteners are incorrect size. 2. Use recommended fasteners.
3. Fasteners are bent. 3. Use straight fasteners.
4. Magazine or nose screws are 4. Tighten screws sequentially.
loose.
5. Driver is damaged. 5. Replace or recondition driver.
6. Nosepiece misaligned. 6. Align nosepiece.
Brads or staples are driven too far. 1. Air pressure is set too high. 1. Check air pressure.
2. Bumper is worn or broken. 2. Replace bumper.
O-Rings have been replaced and/or 1. Screws were not tightened 1. Loosen all screws first, and then tighten
re-lubricated, but air still leaks out. sequentially. sequentially using
1
⁄2 turns.
2. Not enough grease was used on 2. Remove O-Rings and re-lubricate.
O-Rings.
3. Wrong type of grease was used 3. Remove O-Rings and replace with new ones
that damaged O-Rings. Use grease that is safe for rubber.
4. Nailer lubrication oil is not 4. Completely disassemble nailer and clean
rubber-safe. Replace all O-Rings. Use rubber-safe
grease for new O-Rings and only use
Pneumatic Tool Oil in the future.